
Here you can find the most recent Tech Tips from our newsletter.
Tech Tip #42: Mastering the XML editor for advanced argument management
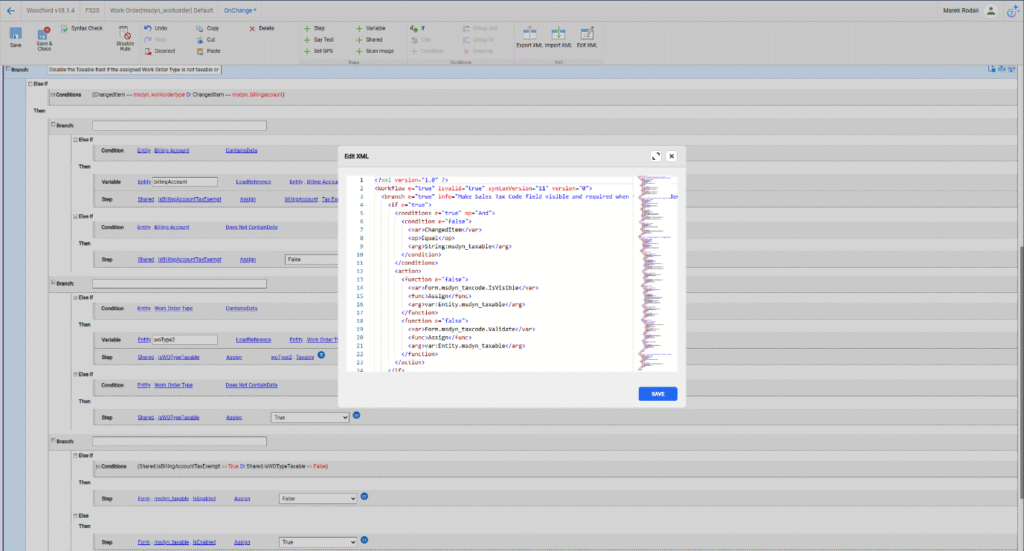
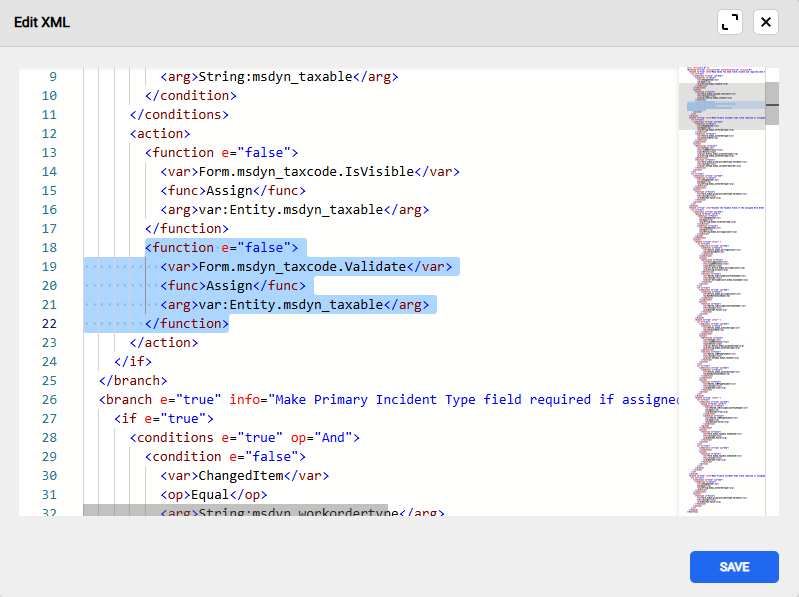
Have you found yourself wanting to copy logic between triggers, duplicate arguments between branches, or even move rules between entire projects without recreating everything from scratch? The XML Editor in Woodford’s Rules Editor is the solution to many of the issues you may have encountered. It’s a lot more powerful than it looks!
(You’ll find the Edit XML option at the top of the Rules Editor ribbon. XML editing is also available in both Rules and Commands!)
Here’s what you can do with it:
- Copy arguments between triggers like onLoad, onSave, or onChange. For example, if a validation function exists under onChange, but needs to run on onSave as well, just copy the <function> block from one trigger to the other.
- Move logic between branches without rebuilding complex structures in the UI. In the tree view, rules can get deeply nested. Copying entire <branch> or <condition> blocks in the XML saves time and ensures nothing is missed.
- Transfer rules across projects, such as from a Field Sales project to a Field Service one. After exporting a rule’s XML, you can paste it into the matching location in the destination project, adjusting entity references if needed.
- Search faster inside the XML Editor than using Ctrl+F in the UI. For instance, searching for, say, “msdyn_taxcode” lets you jump directly to every instance it’s used (whether in Assign, Validate, or IsVisible functions).
- Fine-tune variables and functions in ways the UI can’t easily expose. Need to change a function parameter from True to False across multiple branches? Editing in XML means you can batch your adjustments.
Watch out for:
When copying shared variables, make sure the variable exists in the target branch or project. If it doesn’t, either define it or expect errors during runtime.
More on the Rules Editor here.
Tech Tip #41: Geocoding with Azure Maps and Google Maps
Microsoft has officially deprecated Bing Maps support. That’s why we’ve updated Resco’s geolocation features to ensure your apps stay current and ready for the future.
With modern alternatives like Azure Maps now supported, you can continue to display records on maps and convert addresses into GPS coordinates, all with improved accuracy and flexibility. The update is a good thing: it gives you access to a more powerful and actively supported geolocation platform.
Wait. What is geocoding?
Geocoding is the process of converting a human-readable address (like a street name, city, or postal code) into precise geographic coordinates (latitude and longitude). This allows you to display records on a map or use location-based features.
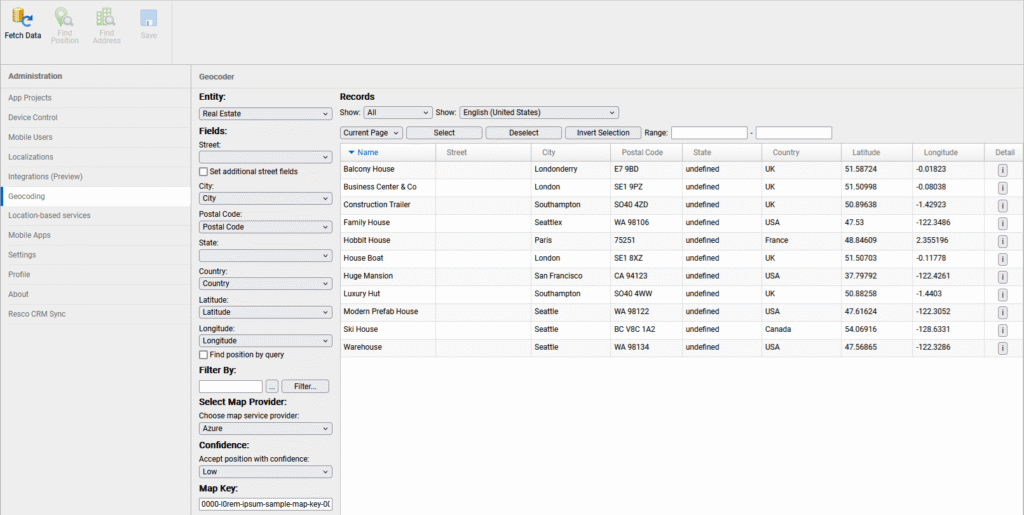
Geocoding with Azure Maps (starting Woodford v18) Woodford 18 introduces support for Azure Maps geocoding. This allows you to convert address fields into GPS coordinates. To get started:
- Open Geocoding from the Administration menu in Woodford.
- Select Azure as your map provider and enter your Azure Maps API key. (Use Microsoft’s authentication guide to get your key.)
- Choose an entity that contains address fields, then map each field (e.g., Address1_city = City).
- Define where Latitude and Longitude should be saved.
- Use “Fetch Data” to load records and then “Find Position” to geocode them.
Pro tip: If your address data is incomplete (e.g., no city or ZIP), enable “Find position by query” to let Azure Maps estimate the location using available info.
Cost considerations Google and Azure Maps are not embedded, meaning your app performs real API calls to fetch data—so pricing is based on usage. If you’re looking for a free option, OpenStreetMap remains supported in the Geocoding component and is free to use (API key required).
Geocoding Status Overview After geocoding:
- Green: New GPS data added.
- Blue: Existing GPS data updated.
- Red: Geocoding failed or empty coordinates.
You can also manually tweak GPS data by opening the detail view of a record, dragging pins on the map, or typing coordinates/address manually.
In summary:
- Use Woodford v18+ for Azure Maps geocoding.
- API calls = metered billing. Plan usage carefully.
- OpenStreetMap = cost-free option (geocoding only).
Find full instructions in our Winter 2025 Release Notes or the Geocoding wiki page.
Tech Tip #40: Mastering multi-select and “Select All” in list views
Did you know that Resco’s list views allow you to select multiple records with ease and perform useful actions on them? You can even select all currently loaded records with one click, but as a feature it’s kind of a hidden gem 😊
Here is how it works:
Starting multi-selection
To begin selecting multiple records, either:
- Tap and hold a record until checkboxes appear
- Use the lasso tool on map views
This will activate multi-selection mode.

Selecting all loaded records
In list views, look at the bottom-left corner of the screen. Clicking this area will bring up the “Select” menu.

Selecting “Select All” will select only the records currently loaded in the view. If your list is paginated (common for large lists), scroll through to load all items first if you want to select everything.
Pro Tip: The “Select All” option is intentionally somewhat hidden to prevent accidental bulk selections.
Performing actions on selected records
Once records are selected, you can perform a variety of actions:
- Use the hamburger menu (top right corner) to access configurable commands like Export or Delete – even less obvious options like “assign to me” or whatever custom commands you can imagine.
- Use the menu in the status bar (bottom right corner) to access statistics and aggregation functions such as Sum, Average, Minimum, Maximum, Count, and Count Distinct.
These tools give you flexibility when working with bulk data and can help you analyze or manage your records quickly.
For more tips on using multi-selection and list views efficiently, check out our guide on the wiki.
Tech Tip #39: Building a barcode scanning flow to create linked records
For a truly efficient scanning loop use this configuration to minimize interactions down to one tap per scan via Save and Next. It’s ideal for rapid-fire barcode entry scenarios.
This setup works well in all kinds of situations where you need to connect related records, like scanning products into an order, checking in attendees, or logging items into inventory. It doesn’t need any custom coding, which makes life easier, and it’s flexible enough to fit into whatever process you’re working with. Plus, you can build in a quick confirmation step before anything gets saved, so users can double-check their input.
How do I set it up?
1. Add a Scanning Section to the Parent Form
First off, create a new tab (e.g., “Add Items”) that will serve as a temporary workspace for scanned entries.

- Add a “New Item” button to initiate the scan.
- Place two additional buttons in the “Add Items” tab:
- Save – creates the record and returns to the main form
- Save and Next – creates the record and starts the next scan
2. Define Shared Variables
Use shared variables to pass data between actions:
- Shared.scannedString – stores the scanned barcode
- Shared.product (or other entity) – lookup to the scanned record
- Shared.quantity (or other value) – any additional input
Add input fields for these shared variables to the “New Line” tab if you think user confirmation or adjustments are going to be needed.

What about the button rule logics?
Scan/Add New Item
- Hide all tabs except “New Line”
- Trigger the scan and store the result in Shared.scannedString
- Query the appropriate entity using the scanned string (like matching a product code)
- Assign the result to Shared.product

Save it!
- Create a new record in the target entity (e.g., a line item or child record)
- Set values:
- Reference to Shared.product
- Quantity or other inputs
- Parent lookup to current record
- Save the record
- Clear shared variables (!)
- Show the main tabs again

Save and Next!
- Follow the same steps as Save
- Immediately trigger the next scan by repeating the logic from “Scan/Add New Line”

Tech Tip #38: Adding a signature date with automation in Resco Reports
If you’re working with enhanced signatures in Resco’s Report Designer, you might have encountered the need to include a date stamp along with the signature. Here’s a method you can follow to streamline the process using fetch variables.
Be aware, however, that this particular example only really works when creating a report for a single record – it won’t work with a list of records or a combination of the two. In those two cases this is still possible, but it requires a slightly different approach.
1. Version check:
First, verify you’re using the latest version of the Woodford solution, as signature handling might differ. At time of writing, the latest version is v18.0
2. Signature variable setup:
- In the Report Designer, go to the Edit Sources button and add a Fetch Result variable connected to the annotation Entity.

- Add conditions that check for the objectid to filter the specific signature you want.

- For capturing the date, use the “Modified On” field, which records when the signature was signed.
Make absolutely sure you’re creating the signature variable fetch at the report’s root level, not just for a single component (e.g., a repeatable group). This guarantees the scope covers the entire report.
3. Sort conditions:
- After defining the fetch result, add a sort condition to order the signatures based on the Modified On field in descending order. This will ensure that the latest signature is shown.

4. Adding the date to the report:
- In your report layout, insert a cell to display the signature date using the [signature]Note.Modified On field. This fetches the “Modified On” field from the signature data and displays the signing date on the report.

This approach allows you to display the signature along with the date it was signed, all configured through the Report Designer. Make sure you’ve highlighted the correct scope of the report (root level) to ensure the signature variable is properly linked.
For more detailed steps on configuring signatures, be sure to refer to the relevant sections of the Resco documentation or reach out for support with screenshots to clarify any issues.
Tech Tip #37: Managing multiple inspections in Power BI
If you’re working with multiple questionnaire templates in Power BI this tip’s for you. Here’s what you need to know:
Do you need a single table for all inspections?
Each template has unique lookups and relationships, making it difficult to consolidate them into a single table. While it might be tempting to keep everything in one massive table, this approach could lead to performance issues and unnecessary complexity. Instead, it’s best to create a dedicated table for each template.
Best practice approach
- Dedicated tables for each inspection: Since each template has a different structure, it’s best to create a specific table for each one rather than merging all inspections into a single massive table.
- Utilizing the right tables: Ensure you’re referencing the correct Dataverse tables. If you’re starting from scratch bear in mind that the newer resco_questionnaireanswers table stores responses, replacing resco_questionnaire that was primarily used before.
- Fixing JSON connection issues: If issues arise during JSON parsing, double-check your relationships and ensure GUIDs are correctly extracted. The Split Column command in Power BI can help separate GUIDs from lookup strings.

Key takeaways
- Each questionnaire template should have its own dedicated table for clarity and accuracy.
- Consider using resco_questionnaireanswers instead of resco_questionnaire for up-to-date data handling.
- Utilize Power BI’s Split Column feature to extract GUIDs and improve data relationships.
For further insights, check out the Resco Wiki’s deep dive on questionnaire visualization in Power BI.
Tech Tip #36: Preventing “Entity Not Loaded” errors with the ContainsData operator
Are you facing issues with rules in your system that trigger “Entity Not Loaded” errors? These errors often occur when a variable hasn’t been properly initialized before being used in your rules. A simple and effective way to avoid this issue is by using the ContainsData operator to check if a variable has been populated before proceeding with your rule’s logic.

How to Implement the ContainsData Check:
- Identify the Variable: Determine which variable(s) in your rule might be causing the issue due to uninitialized data.
- Use the ContainsData Operator: Before your rule tries to access or use a variable, include a check to see if the variable contains data. The basic logic structure is:
- If: VariableName Contains Data
- Then: Proceed with the rule actions.
- Prevent Errors: By adding this conditional check, you prevent the rule from running into a scenario where it tries to use an empty or unassigned variable, thus avoiding the “Entity Not Loaded” error.
- Test Thoroughly: After implementing these checks, test your rule across different scenarios to ensure that it behaves as expected and that no errors are triggered.
Pro Tip: It’s a good practice to apply this check to any rule where variable data might not be guaranteed to be present at runtime. This will help maintain the stability of your rules and ensure they execute without interruptions.
By integrating the ContainsData operator into your rule logic, you can safeguard your processes against common data-related errors, keeping your workflows smooth and reliable.
For more tips about using user-defined variables in the Rules editor, don’t forget to check this section in our Wiki!
Tech tip #35: Troubleshooting incorrect images in child repeater reports
If you’re having trouble displaying correct images when using a child repeater in your reports, don’t fret! Here’s how you can resolve issues where the same or an incorrect photo appears across multiple rows:
Steps by step:
- Add an annotation filter: Make sure you’ve applied a filter to the IMG:annotation field to accurately link images to their respective records. Without the filter, unrelated photos may appear in all rows.

- Use “Does Not Contain” operator: Instead of using “Does Not Equal” for filtering out subjects, use “Does Not Contain”. The latter ensures partial string matches are excluded, which is especially helpful when specific keywords are used in filenames.
- Switch to the filename field: If the unwanted images are appearing due to subject names being used for filtering, switch to the filename field instead.
- Replace OR with AND: If you’ve applied multiple filtering conditions using an OR statement, replace it with AND. This ensures only those images that match all criteria are shown.
Following these guidelines will help ensure that only the desired images are included in your child repeater report.
Tech tip #34: Stay updated with Resco Wiki changes using RSS/Atom feeds!
Keeping up with changes on the Resco Wiki is your best bet for staying informed of all our latest updates. However, whether it’s release notes, new features, or upcoming releases, it’s easy to get bogged down in any comprehensive list of recent changes.
Thankfully, tools like RSS and Atom feeds can make this whole process a lot easier – guaranteeing you receive only relevant information, delivered straight to your preferred feed reader.
Default wiki tools for change tracking:
- Recent changes
Located on the left menu, this tool displays all recent changes across every page in the wiki. It’s comprehensive but may be a little overwhelming if you’re only interested in specific topics.
- View history
Available at the top of each wiki page, this feature shows the edit history of that particular page, giving a detailed timeline of changes.
Simplify tracking with RSS and Atom feeds:
Following the recent changes or page histories manually can get exceedingly tedious. That’s where RSS and Atom feeds come to the rescue!
- RSS feed example: The Resco Wiki has an RSS feed for every page. Here’s a sample RSS feed for tracking changes to the Release Notes page:
https://docs.resco.net/mediawiki/index.php?title=Release_notes&action=history&feed=rss
If we wanted to instead follow the page on deprecations, we might adjust this link to read:
https://docs.resco.net/mediawiki/index.php?title=Deprecations&action=history&feed=rss
- Atom feeds: On each history page, look for the “Atom” button (see screenshot). Clicking it will provide a personalized feed that you can follow in any Atom-compatible reader.
Additional tips and tools:
- More details are available on the Wikipedia Syndication page, which covers RSS/Atom feeds and watchlists. Be aware that when it comes to watchlists, these are only available for logged-in users and so are inaccessible to the general public.
- Readers: To optimize your tracking, consider popular feed readers like Feedly or Inoreader. These tools can help you organize feeds from various sources, including the Resco Wiki.
Pages worth following:
Make sure you follow pages like the general release notes, upcoming releases, deprecations and other key topics. This way, you’ll never miss an important update.
Tech tip #33: Disabling the CLEAR action in note attachments
When managing document actions within your application, it may sometimes be necessary to disable certain functionalities like the CLEAR action.
If you’ve tried disabling the delete rights in the configuration but the CLEAR action remains available, the solution involves adjusting the DocActions through the Note’s Form On Can Execute rule. Here’s how you can easily get this done.
Step-by-step guide:
- Edit the note form: Edit the app project in Woodford. Scroll down to the Annotation/Note entity and edit its form.
- Access the On Can Execute rule: Modify the ‘On Can Execute’ rule for the Note’s Form. This rule determines whether specific actions are permissible.
- Modify the rule: If the CLEAR action is still visible after removing delete rights, explicitly disable it by setting the On Can Execute rule to return false for the CLEAR action.

- Test the configuration: After applying these changes, test the document timeline to ensure that the CLEAR action no longer appears.
This configuration helps maintain control over document management by ensuring that users can only perform actions that are explicitly allowed.
For more detailed instructions on configuring document actions, check out our in-depth guide on the Command Editor in our Wiki!
Tech tip #32: Effortlessly display Power BI reports in Resco mobile app without hassles
Trying to integrate Power BI reports into your Resco mobile app but hitting a licensing roadblock?
By using the “Embed to website or portal” option, you can include public Power BI reports in your Mobile CRM or other Resco apps through simple iframe integration.
This method is great for sharing insights without the need for viewers to have a Power BI Pro or Premium license.

What’s the deal?
- Public or shared reports: This approach is designed for embedding publicly available Power BI reports or those shared within a controlled environment, such as an internal company portal.
- No Pro or Premium license required: Viewers can access and view the reports with just the Free license, which is available to any Microsoft account that has logged in to Power BI at least once.
- Simple and effective: While this method offers less in the way of customization, it’s incredibly straightforward and effective for deploying non-sensitive information across your organization.
The two-step process:
- In your Power BI report, go to File -> Embed report -> Website or Portal and copy the link.
- In the application, add an iframe to a location from which you’d like to open the report. Insert the copied link and you are done.

Key considerations:
- Security: Since this embedding option does not require viewer authentication, it’s best utilized for non-sensitive information. If you’re dealing with confidential data, ensure additional security measures are in place outside of Power BI to protect your information.
- Ease of deployment: If your goal is quick and easy deployment without compromising on sharing vital insights, this embedding method is the right choice for your organization.
- Administrator privileges required: The process of embedding reports into a website or portal, and subsequently into an iframe, must be performed by an administrator with a Power BI Pro or Premium license. This ensures that the reports being shared comply with Power BI’s licensing policies, even as they are made accessible to viewers without individual licenses.
For more information on Power BI in your Resco mobile applications and making the most out of your business intelligence tools, check out our documentation on the wiki.
Tech tip #31: Optimizing sync filters to reduce record cleanup delays
Encountering the dreaded “Many deletes in record cleanup” warning during synchronization can be a sign of inefficiency in your sync process. This will usually happen as a result of sync filters that aren’t properly configured, leading to the unnecessary download of records that are then deleted during the cleanup process. Here’s how you can tackle this issue and streamline your synchronization:
Review and Simplify Sync Filters: Start off by examining the sync filters for the entities that are causing delays. Simplifying these filters can prevent the system from downloading unnecessary records in the first place.
Ensure Consistency in Linked Entity Filters: When employing linked sync filters, such as connecting an account entity filter with a contact entity filter, it’s crucial to maintain consistent conditions across both filters to prevent discrepancies and unnecessary cleanup efforts.
Example: Imagine you manage a server with 1,000 accounts, 100 of which start with the letter ‘A’. Each of these ‘A’ accounts is linked to 10 specific contacts. You set your account sync filter to only include accounts starting with ‘A’. However, if your contact sync filter is configured to “get all” contacts without considering their linked account, you’ll end up with a mismatch.

This setup results in the system initially fetching all contacts, not just those tied to ‘A’ starting accounts. Consequently, a cleanup operation is needed to remove non-relevant contacts that don’t match the sync filters criteria, leading to unnecessary data handling.
To avoid this, ensure that the contact sync filter mirrors the account filter, for example, by setting it to only include contacts linked to accounts starting with ‘A’. This approach ensures data consistency from the outset, minimizing the need for cleanup and streamlining the sync process.
Monitor and Test Changes: Before rolling out changes to all users, test the updated sync filters and setup parameters with a small group. Monitor the synchronization performance closely to ensure that the changes are having the desired effect without causing additional strain on your server.
Use Diagnostic Tools: Utilize diagnostic logs and tools like the SyncStat Analyzer to gain insights into the sync process and identify areas for improvement. These tools can provide valuable information on how records are being handled during the sync process.
By taking these steps, you can significantly reduce the number of records being unnecessarily downloaded and deleted, leading to faster and more efficient synchronization. Remember, optimization is an ongoing process, so continue to monitor your system’s performance and change things up as needed.
For more detailed instructions and insights, don’t forget to consult our wiki and consider watching our online training sessions on synchronization optimization.
Tech tip #30: Navigating option set customizations in Resco Mobile CRM
In the world of mobile CRM, tailoring the user experience to fit specific business needs is essential. One common scenario involves customizing option sets – dropdown menus that present a predefined list of choices. These are used across various entities within the application, such as accounts, contacts, or custom entities designed to suit your business processes.
On the backend, a large variety of statuses exist, and you most likely want to restrict mobile users to the use of only a specific subset. However, a lesser-known aspect of working with option sets in Resco Mobile CRM can lead to unexpected data changes if not handled with care.
The Challenge:
Imagine that an account’s relationship status needs to be categorized differently based on the project context within the same CRM system. You synchronize your mobile CRM app to reflect a specific relationship status for an account, say “Customer” in one context and “Consultant” in another. Upon switching contexts, you find that the account’s relationship status automatically adjusts to a new value without any manual input, potentially leading to confusion or data integrity issues.

Under the Hood:
This automatic adjustment is the result of the “Set Combo Items” function being triggered on form load, a feature designed to filter and potentially reset option set values based on predefined rules. While its primary intent is to streamline form customizations and ensure data consistency, it might inadvertently overwrite existing data if not configured carefully.
Solution and Best Practices:
- Understand Usage: It’s crucial to know that while the function is intended for filtering option set items, it can also reset values to a default or first alphabetical choice if the existing value doesn’t match the newly filtered set.
- Implement Strategically: When leveraging the “Set Combo Items” rule, especially in forms associated with existing records, it’s essential to consider the impact on data already entered. If preserving existing data is crucial, developers must implement logic checks to prevent unintentional overwrites.
- Test Thoroughly: Before deploying any changes involving option set customizations, conduct extensive testing across various scenarios and user roles. This ensures that the application behaves as expected and that data integrity is maintained across different project contexts.
- Encourage Feedback: get users to report any unexpected behaviors related to option set customizations. This feedback will prove invaluable in identifying and rectifying potential oversights in rule configurations.
Conclusion:
Option set customizations in Resco Mobile CRM offer powerful flexibility for tailoring application behavior to specific business needs. However, understanding and cautiously implementing features like the “Set Combo Items” function are critical to maintaining data integrity and ensuring a seamless user experience.
If you’d like to learn more, don’t forget to check out our wiki!
Tech tip #29: Reviving closed opportunities with ease
In the traditional sales process, we typically deal with standard entities like opportunities, leads, or orders, though the specifics will vary from one customer to another. It’s worth noting that Resco Mobile CRM, by default, doesn’t permit the reactivation of closed opportunities. If this functionality is critical for your operations, you’ll be pleased to learn that the solution is a lot simpler you’d think!
Solution:
- Identify the Issue: Users report the absence of the “Live” button on the form for closed opportunities, despite the command being active.
- Implement OnCanExecute Rule: The trick to solving this issue lies in configuring an OnCanExecute rule specifically for the “ChangeStatus” command. This adjustment allows the “Live” button to display correctly for closed opportunities, enabling them to be reactivated.

Takeaways:
- The Right Command: It’s crucial to use the correct command. A lot of the time you might find that it’s the “ChangeStatus” command, not “ChangeState”, that should be used to modify the status of closed opportunities.

- The Right Rule: On Can Execute rules control whether a command is displayed or hidden.
Additional insights:
- If you’d prefer to reactivate opportunities en masse, no worries! Just add the same command as a multi-select action.
- View Limitations: Although it’s not possible to hide buttons in views based on conditions (e.g., hiding the “Live” button for open opportunities), configuring OnCanExecute rules ensures commands are available under specific conditions, such as the opportunity being won.
By understanding and applying these tips, users can efficiently manage and reactivate closed opportunities, ensuring no sales potential is left untapped. Always remember to review command configurations and rules for optimal application performance!
Check out our Wiki for more detailed guides and tips on customizing your application’s behavior with OnCanExecute rules and other functionalities.
Tech tip #28: Create a gallery view for documents and images
Discover how to create a practical and appealing gallery view in just a few simple steps!
Here’s how:
- Set Up Columns: Start by configuring the columns in your view (Properties menu, under View). This foundational step allows you to organize and structure your content effectively.

- Customize Style: Create a new style based on the “ImageCellStyle”.
- Implement an “ImageQuery” within this new style. This is going to be crucial for fetching and displaying images in the gallery.

- Add an Image Cell: Once your style is ready, add an Image Cell to your view.
- Apply your newly created style to this cell. This will ensure that images are displayed according to your specifications.
- By following this procedure, you can create a gallery view that makes gaining an overview easy… and looks good doing it!
Tech tip #27: Streamlining Data Access with the “Not Older Than X Days” Operator
Have you ever found yourself sifting through a sea of outdated tasks, work orders, or bookings on your mobile app? Say goodbye to inefficiency with our latest feature: the “Not Older Than X Days” operator. This new addition to your toolkit allows you to easily filter and display only the most recent and relevant data, based on the date of record creation or change. This means you can now see tasks or work orders that are, for instance, no older than 10 days – ensuring that the information you access is always fresh and pertinent.
How to Use This Feature:
- Select a Record: Choose any record, like a Task, that contains a specific time-related field (like the start date).
- Set Up the Sync Filter: Navigate to the sync filter and add a condition using the new operator.
- Input Time Frame: Simply type in the number of days (e.g., 10 days) to filter records that are not older than the specified duration.

Benefits:
- Ease of Setup: Configuring this operator is extremely straightforward
- Sync Optimization: Improve the efficiency of your app’s synchronization, ensuring faster and more relevant data retrieval.
- Enhanced Productivity: By focusing on recent data, users can work more efficiently, enhancing their daily productivity.
For more details and in-depth guidance, don’t forget to keep an eye on the wiki. This feature will be available and fully documented in the Winter 2024 release.
Tech tip #26: Streamlining report creation from questionnaires
In the wake of our recent update, have you noticed a change in the process of generating reports from questionnaires? You’re not alone! To adapt, remember that while the automatic reports in the Questionnaire Designer are handy, they might not cover all of your needs. For those instances, turn to the Report Designer to craft custom reports with ease:
- Use the Designer for New Reports: The button for generating a report directly from the questionnaire has been retired. From now on you can initiate report creation in the Designer.
- Select the Right Entity: When creating a new report, set the Entity field to “resco_questionnaire”. This step is crucial as it enables the option to generate a report from a template.
- Choose from Templates: Select “From Template” and click on “Select Questionnaire Template”. Pick the questionnaire you want to use as a source for your report.
- Reusability and Efficiency: Once created, your report, based on the questionnaire template, will be saved in the Report Designer for future use. This new method not only simplifies the process but can also boost efficiency in handling reports.
Learn more on Resco Wiki.
Tech tip #25: Enhance your global reach with questionnaire localization
By localizing your questionnaires, you’ll bridge communication gaps and deliver a user-friendly experience to all field service technicians, regardless of language barriers. This enables you to provide tailored content in multiple languages, ensuring clarity and accuracy across diverse user bases.
Implementing Localization:
- In the Questionnaire Designer, click ‘Localization’ to handle multiple language versions.
- Add a new language by clicking ‘Add’, select your desired language, and confirm with ‘OK’. This will show all strings available for translation.
- Translate necessary strings for questionnaires, questions, and groups, including names, descriptions, labels, and options.
- Set the questionnaire to default to the app’s language or enable ‘Language Selection’ for user-specific language choice.
- Save your changes and test the localized questionnaire within the app to ensure all translations appear correctly.
Learn more on Resco Wiki.
Tech tip #24: Optimize client engagement with ‘Select Form’ rule
Use the ‘Select Form’ rule to distinguish between existing customers and potential customers, presenting a tailored form for each group. This smart customization helps to deliver focused user interfaces for data entry and retrieval.
By dynamically adjusting the form view you ensure a streamlined and relevant experience for users, enhancing their ability to maintain existing relationships and develop new ones.
Learn how to set it up on Resco Wiki.
Tech tip #23: Improving advanced sync setups
It’s time to optimize your synchronization for maximum efficiency. Here are two tips we think might save you time and effort in the future.Advanced sync setup modifications:Update your settings to adjust DownloadPageSize. Doing so can dramatically reduce your latency. Keep in mind, this will use more memory.
Pro Tip: Different entities can have different page sizes. For smaller records, you can afford to set a higher page size without worrying about memory.
Tweak NumDownloadThreads. More threads can help you speed up downloads.Remember, “small records” refer to those with minimal data—not just the number of columns or size of text columns. Also, attachments like activitymimeattachment.body and annotation.documentbody are not counted, as they usually contain larger data and are downloaded separately.
Check out the deep dive on Resco Wiki.
Tech tip #22: Rename [Clear] option in option set questions
You now have the ability to rename the default null option, labeled as [Clear], in your option set questions. This feature allows for more personalized and intuitive questionnaires.

To take advantage of this feature, please ensure the following:
- Update both the Questionnaire Designer and the mobile app to version 16.1 or later.
- Open your questionnaire template and select the top-level element. Set the Feature Version to “2”.
- Once these steps are completed, the label for the “not answered” option within the option set becomes editable, allowing for a tailored user experience.
Remember, customization can make your questionnaires more user-friendly and context-specific!
Explore more new features from the Fall 2023 Release on Resco Wiki.
Do you need further technical assistance?
You can reach out to our support team via our Partner support page, Resco Support Portal or search our Wiki.


