To take full advantage of customization in Woodford, admins and project managers need to fully understand the possibilities of forms. This component creates a base for all other customization options and is often one of the most essential parts of the app.
Let’s have a closer look at how to work with forms in Resco’s customization tool Woodford. We will showcase an example on one of the Resco apps – City Smart Services – and provide you with practical tips and tricks on how to take full advantage of the form component.

Not using Woodford yet?
Book a personalized demo of resco.ServicePlatform to see how it can empower your business
What is a form in Resco Woodford?
Thanks to forms, you can set up what information users will see for individual entities. The functionality also allows users to create new records and modify existing field values.
Imagine you have a contact entity in your CRM. With forms, you can add entity information like name, surname, phone number, or address, and the user can edit this information directly in the app.
Also, as a project manager or admin, you can sort the data in a form to separate tabs. So, for a contact entity, you can see the information mentioned above on the General tab, and details like scheduled appointments on the Appointments tab. All this is possible to set up even without programming skills due to our low-code development tool Woodford.
For larger screens, you can even utilize flexible forms to display all tabs simultaneously, so users don’t need to switch between them. You can also customize the position and size of individual components on forms. To learn more about this feature, take a look at the Form Table Designer guide.
How to add forms to your app with Woodford?
You can add a form to any entity available for a project in Woodford. To see a list of forms available for an entity, start editing your app project, select the entity, and click on the “Show UI” button in the top navigational panel.
With the Form Designer, you can make various customizations to forms – set up width, height, expand button, or personalize the tab with an icon. To learn more, check out the detailed information on managing forms at Resco Wiki.
How are Forms implemented in the City Smart Services app?
The City Smart Services app enables municipalities, councils, and local governments to collect suggestions from citizens about possible improvements, technical issues, or quality of services in their city. For this purpose, users of the app have access to a specially designed report form. There, they can describe a case in detail and include a wide range of additional information.
To create this form, our team also enabled to add photos, location, and description of the case. For some parts of the form, they’ve used iFrames, which are components allowing to add external content to the app. You can learn more about how to use iFrames in one of our previous guides.
A step-by-step process of creating a new Incident form in City Smart Services
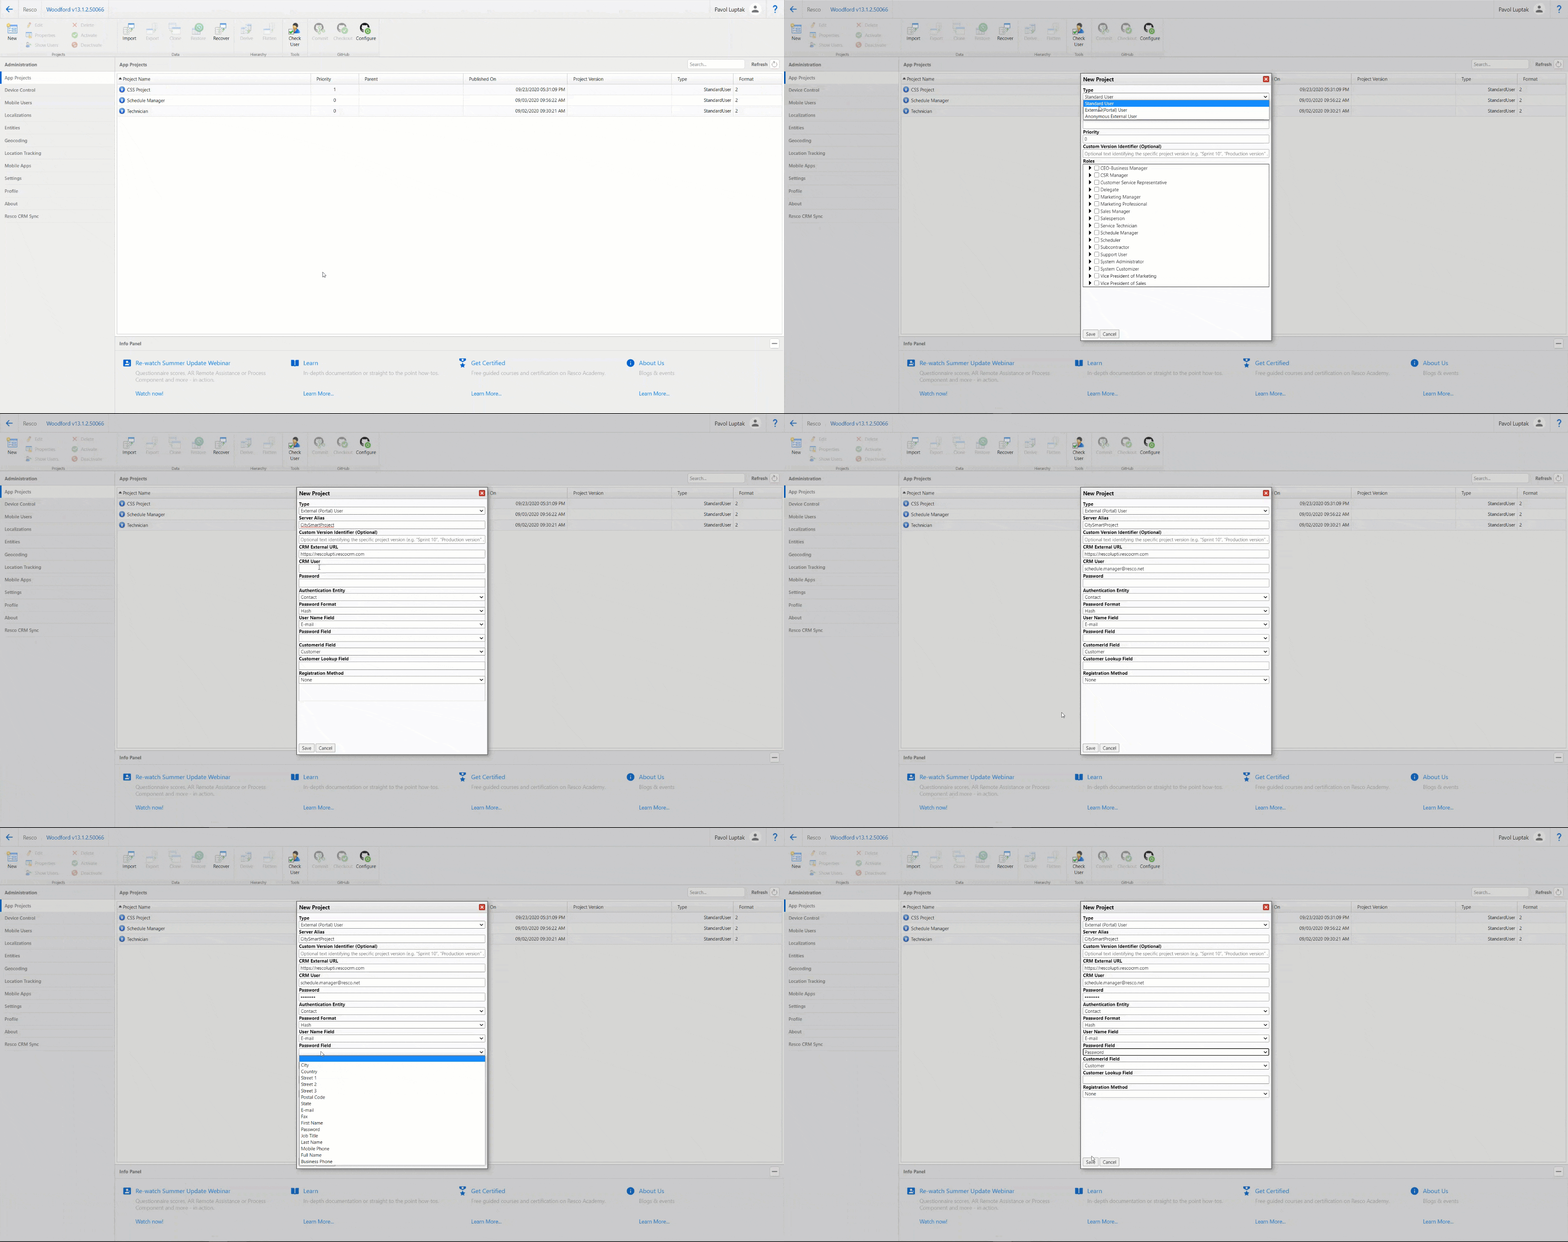
To start with a New Incident form, we created a new “External (Portal) User” project. This setup allows you to create two types of interaction with users – either they don’t need to log in and see universal information, or they use credentials and can access CRM content specifically related to them (this is what we use in City Smart Services).
You can learn more about how to setup an external user project on our blog.
(click on the gifs in this guide to see them in higher resolution)
Afterward, to create the form, we started with Home screen customization, asset preparation, and styles editing. Below you can find detailed instructions on how to proceed through this process:
-
A new field within the Home screen
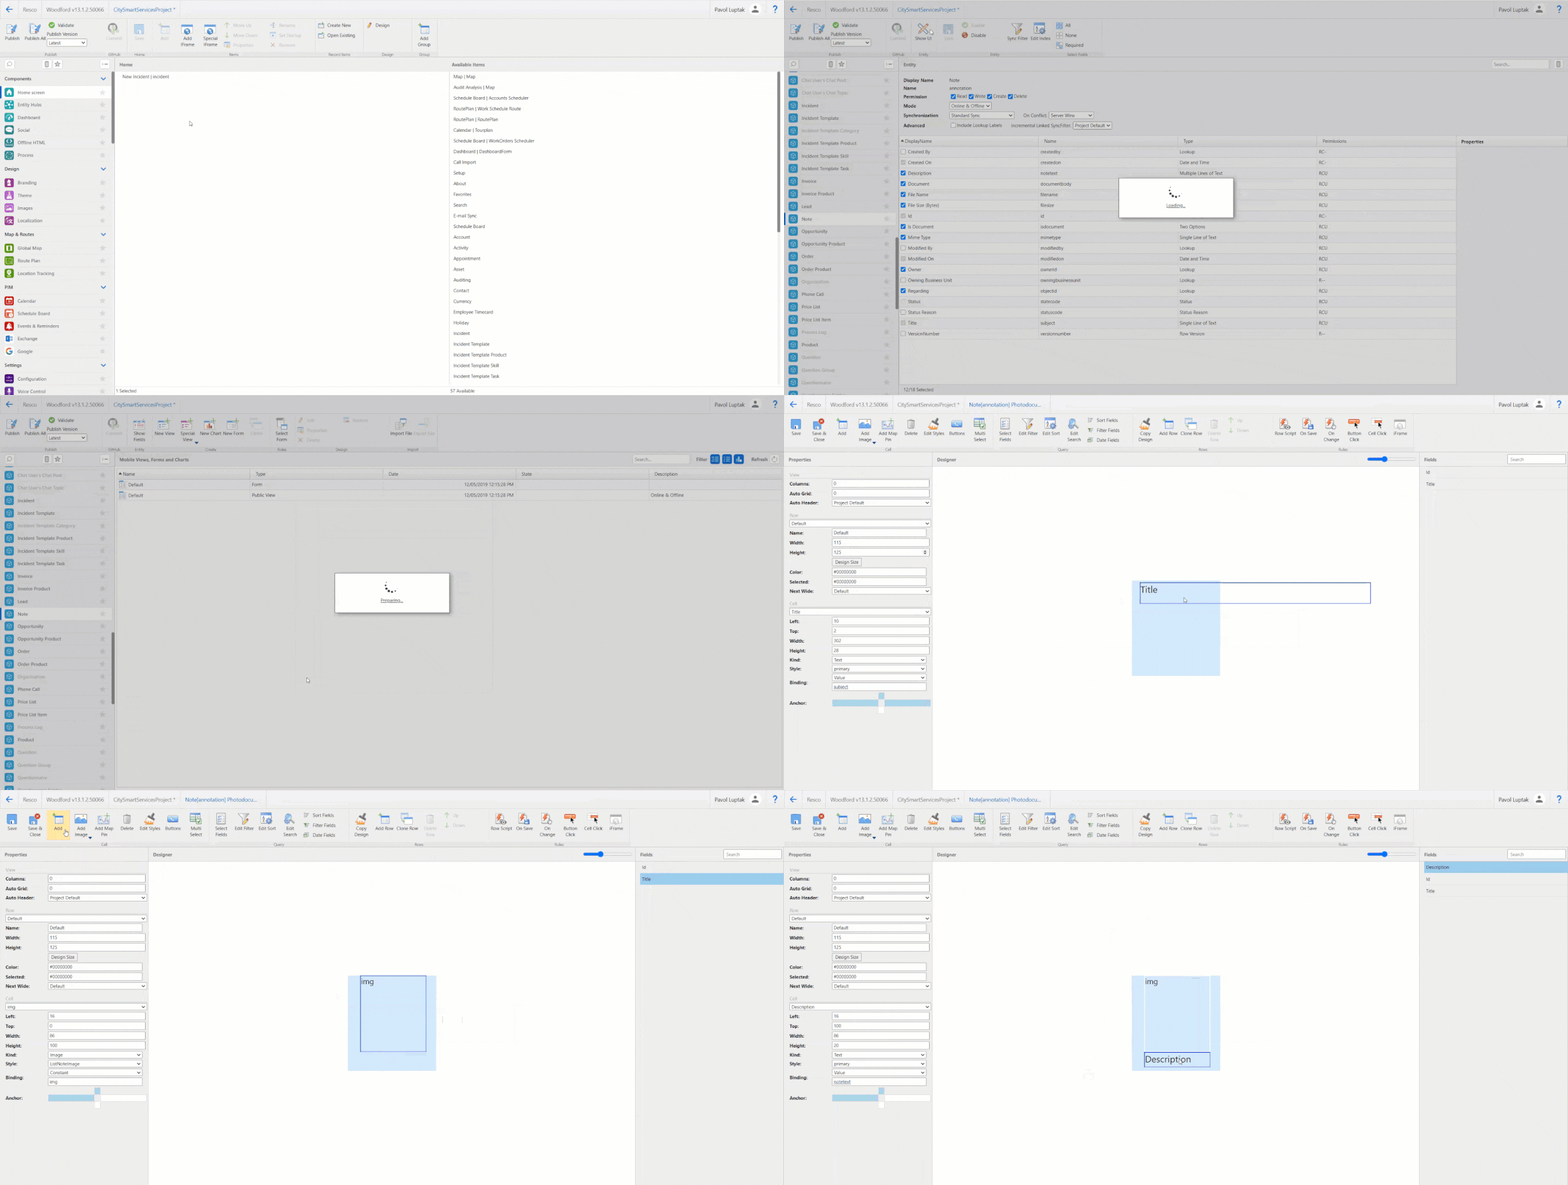
After the initial project creation, we create a new field on the home screen of the app.
Open project -> from Components panel (on the left) choose Home screen -> click on the Create New button in top panel -> choose appropriate name -> choose Incident as an Entity
-
Assets preparation
Before proceeding to the actual form, we prepared some additional assets:
Choose “Note” from the List of “Entities” in the left navigation panel -> Click on the “New View” button on top -> Choose an appropriate name (“Photo documentation” in our case) -> Set the view as “Public List” -> Set the width and height of a row to 110 and 125 values -> Add two fields into the row (img and description) -> Set up them according to the instructions below
Now, let’s customize the General form for the Note entity:
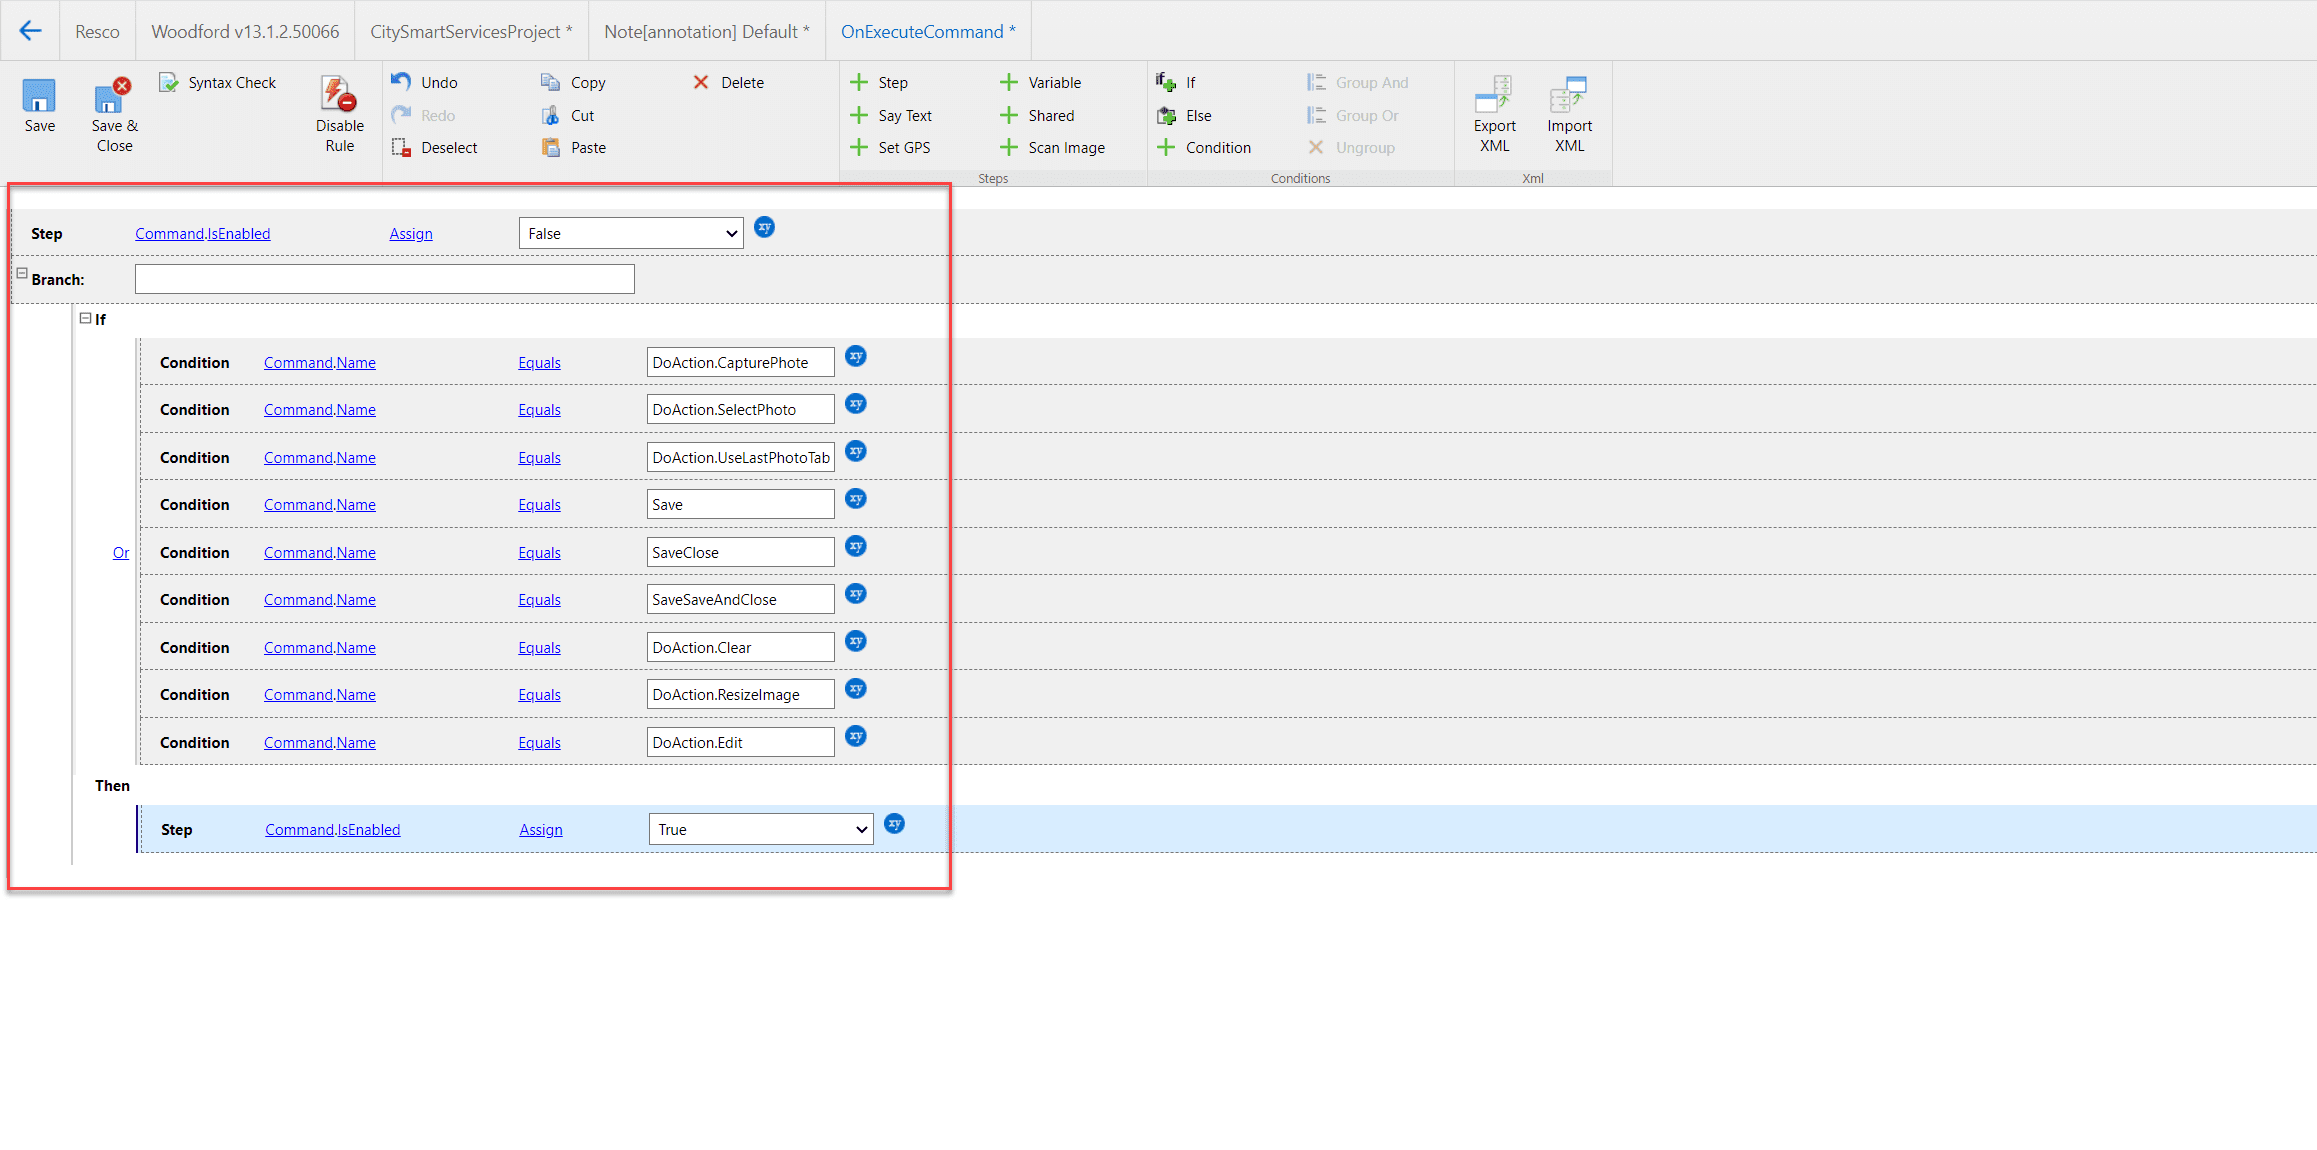
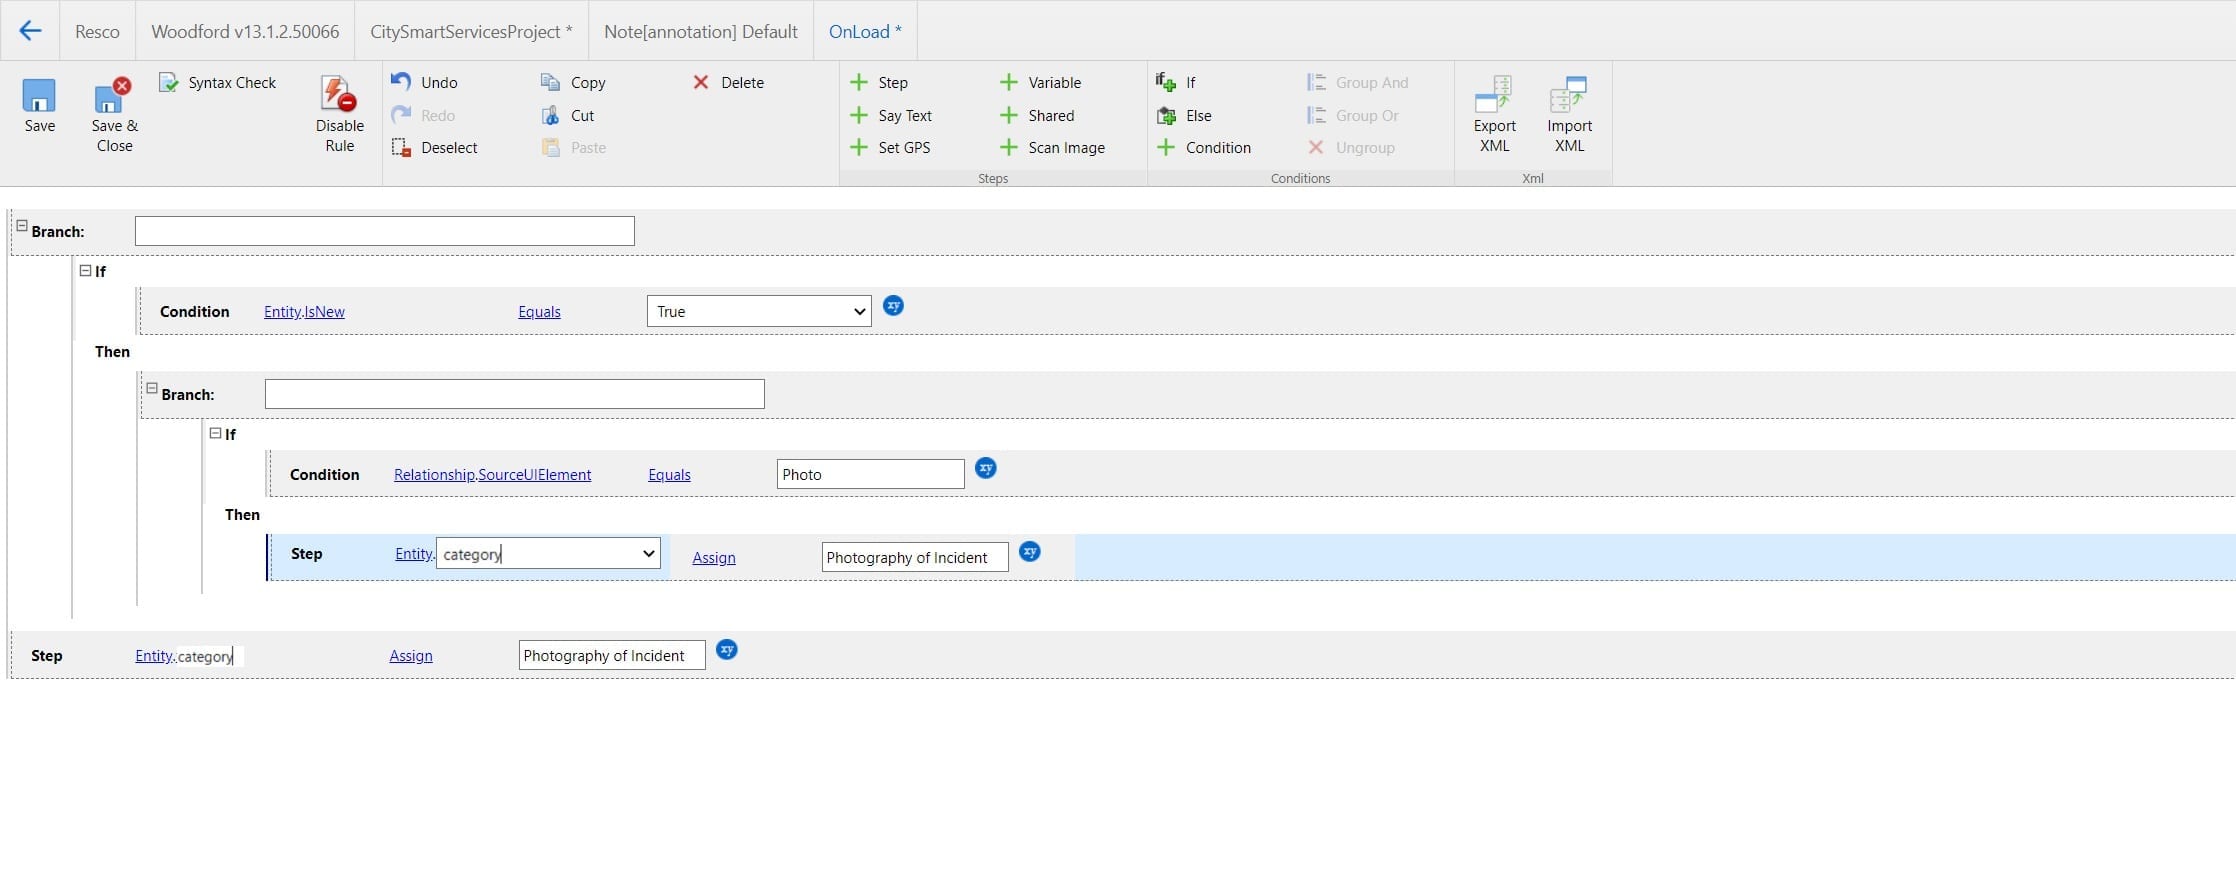
Click on Default Form -> Set up the General tab and Description field according to the image below (Click on the image to open it in higher resolution)
-
Creating an Incident form
Once the additional assets are ready, proceed to the creation of the Incident form:
Choose Incident component from the left panel -> Click on Default Form or create a new one if it doesn’t exist -> Delete pre-existing tabs and fields on the Form -> Click on the edit style button in the top navigational panel
Editing Styles
We are starting from a predefined “Normal” style, but we will also create two additional styles for our needs:
NoLabel Style:
Click on the Normal style from the listed options -> Click on Add option -> Choose an appropriate name in the “Name” field -> Change “LabelPostion” to “Hidden” -> Change “WrapText” option to “True”
NormalLabelUp:
Click on the Normal style from the listed options -> Click on Add option -> Choose an appropriate name in the “Name” field -> Change “WrapText” option to “True” -> Change “LabelFontWeight” to Regular -> Change “LabelHorizontalAlignment” to Near -> Change “LabelPostion” to Top
Adding Photos to the Form
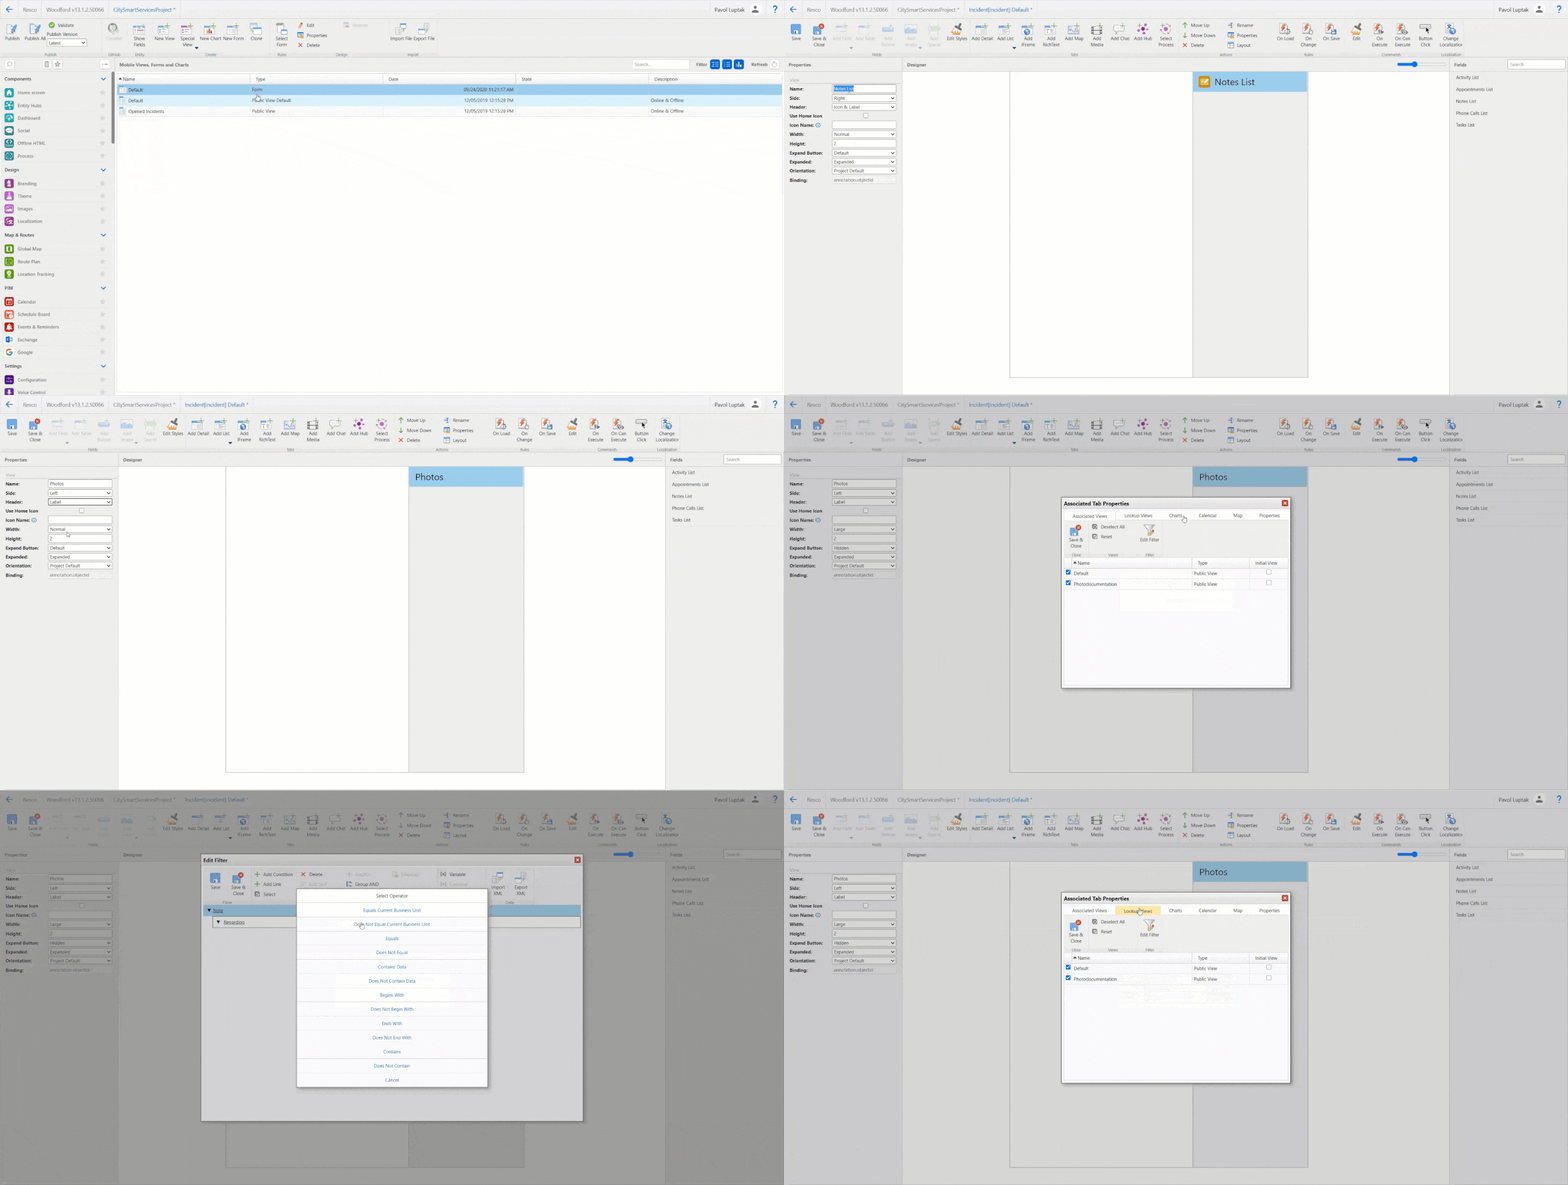
Now, allow users to add photos to the Form. We enabled this option to provide citizens with a fast way how to report a case. And it helps to municipalities, too. Photos provide a quick visual information that serve when evaluating the importance of the case:
When back in the Default Form, click the „Add List” button on top -> Choose “Note List” -> Proceed to the list settings on the left -> Set a name -> Set “Side” to Left -> Set “Header” to Label, “Width” to Large, and “Expand Button” to Hidden
Afterward, double click on the tab you’ve created to see additional settings:
In the Associated Views tab, check only the “Photo documentation” option -> Click on “Edit Filter” on the top -> Add Condition and set it up as follows 1. Regarding 2. Equals 3. (variable) id -> Save and close -> make the same changes in the Lookup Views -> Save and close -> Navigate to the Properties tab -> Choose “Capture photo” -> Save the changes and now you can close the settings of the first tab in the Incident Form
To complete the Incident form, we will also add options for users to choose a category, location, and description of the case.
Category
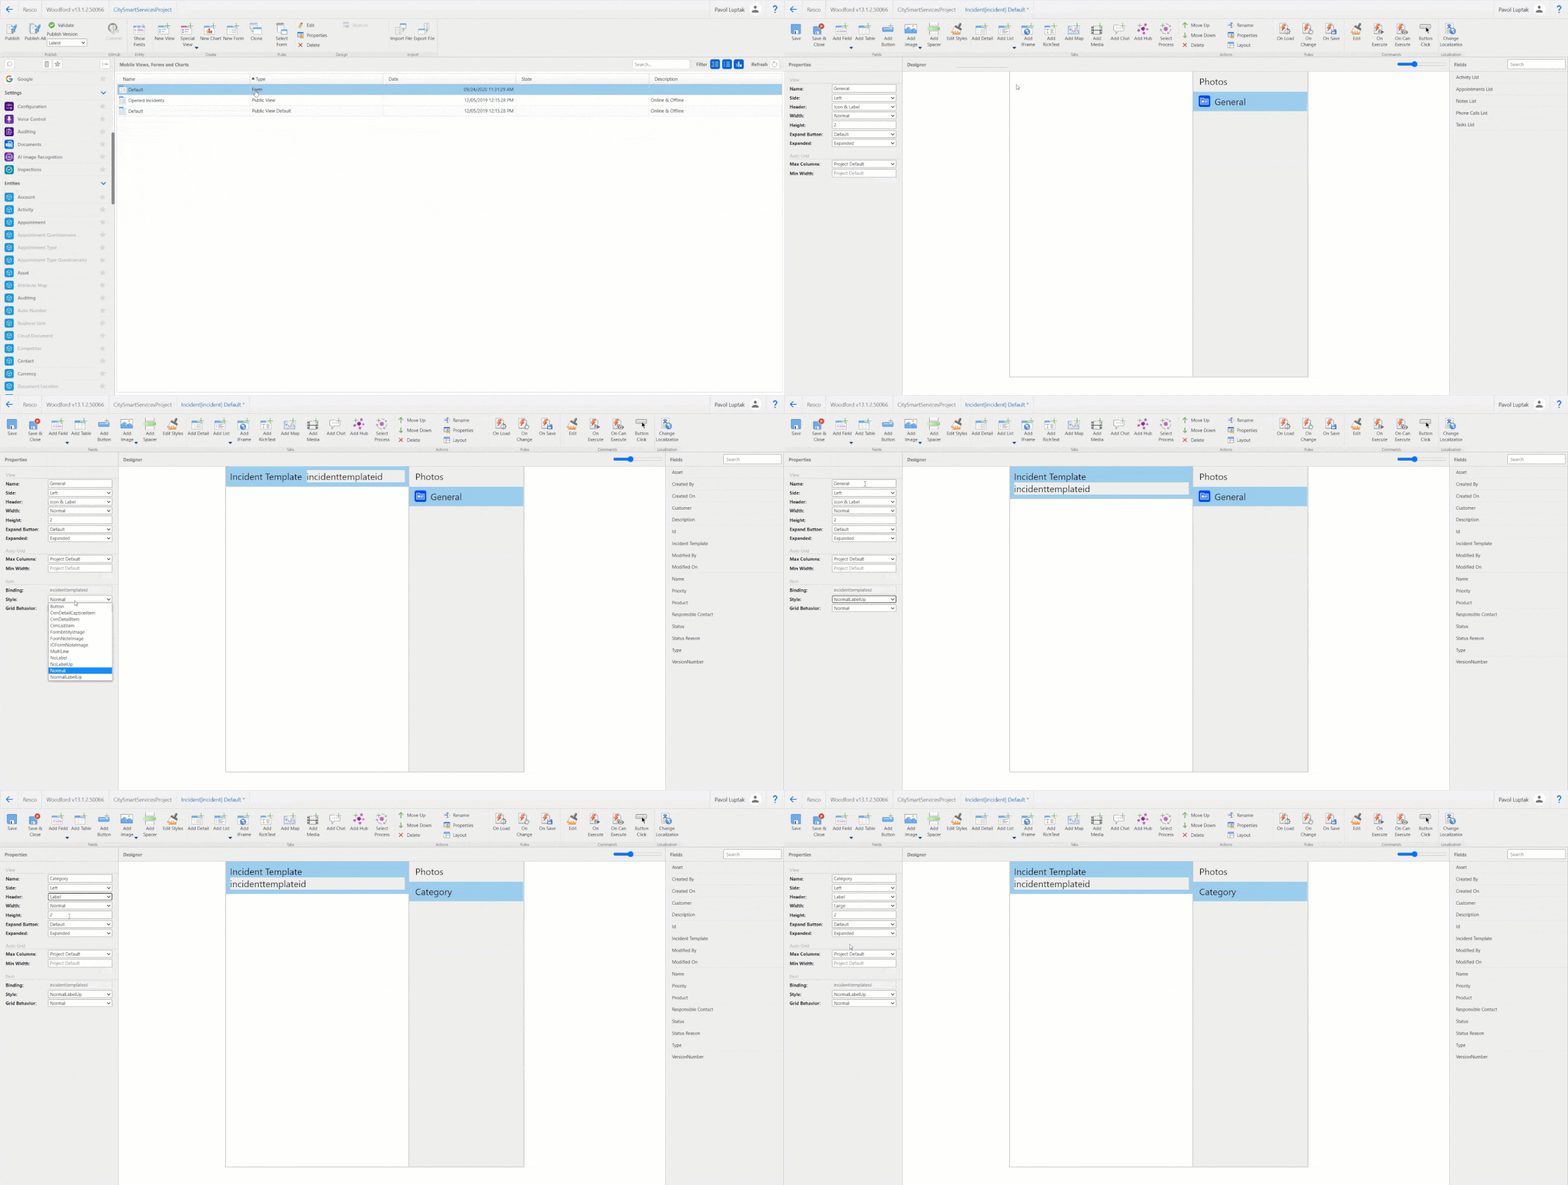
Categories help to sort out the incidents for municipalities. This allows bigger cities with more incidents to categorize the cases and even assign them to different employees, which further improve the respond time:
When at the “Incident” entity and Default form, click on “Add detail” to add another tab -> Click on “Add Field” and choose Incident Template field -> Set the style of the field to “NormalLabelUp” -> Set the properties of the tab as follows Name: Category | Side: Left | Header: Label | Width: Large | Expand Button: Hidden
Map
To efficiently respond to an incident, it is necessary to know where it happened. We enabled the citizens to interact with the Google Maps, which is a well-known platform enabling to quickly localize an issue. You can add Maps to your form as follow:
Click on the “Add Map” button to add another tab to the form -> Double click on the tab to open settings -> Name the tag as “Location” -> Set the Side to Left | Header to Label | Width to Large | and Expand Button to Hidden -> For Latitude and Longitude field choose “Latitude”/”Longitude” from the list of options
In this tab you can harness the power of iFrames to add Google Maps. Navigate to the iFrame guide for more information.
Description
And finally the option to add notes to the incidents. While photos, categories, and map provide a good amount of information, citizens are free to add some lines, too. This data often include specification about the location, or suggestions about possible solutions. Adding a description field in Woodford is very straightforward:
Click on “Add detail” to add another tab -> Set a name to Description -> Set the properties of the tab as follows Side: Left | Header: Label | Width: Large | Expand Button: Hidden
The key part of the City Smart Services app
So, that’s how we’ve created the fundamental part of the City Smart Services app with Woodford – A new incident form. Today, the CSS solution serves to citizens and municipalities around Slovakia, enabling them to take advantage of mobility to make their city a better place.

Not using Woodford yet?
Book a personalized demo of resco.ServicePlatform to see how it can empower your business
As all of the components that we used in the CSS app are flexible and applicable to various use cases, you can take an advantage of them either if working in field service, manufacturing, or energy industry.
Customize your app’s forms
Forms are the backbone of customization in Resco solutions. They allow you to create data hubs for the users and make the most important information to stand out. When combined with iFrames, you can create an even more compelling app without the need for advanced developer skills.

If you haven’t started to customize your solution just yet, take a look at Resco MxDP platform and request a free demo to see the full power of multi-experience development.
And if you want to get more practical tips on Resco solutions and customization, visit Resco Academy and enroll to one of the many courses available.


