Resco CRM Logo Resco CRM

Thank you for trying Resco CRM!
Let us guide you in 6 basic steps

Start your tour

  • 1Get started with the Web client
  • 2Customize the solution
  • 3Customization console
  • 4Import your data
  • 5Synchronize mobile client
  • 6Track all your emails
  • Next

Web client consists of 3 basic parts

A. Home

List of shortcuts to your customers, contacts and deals.

B. View

List of records, such as customers, contacts, deals, etc.

C. Form

Detailed information about the selected record from the view.

Forms can be modified to show only those fields that are required.

  • 1Get started with the Web client
  • 2Customize the solution
  • 3Customization console
  • 4Import your data
  • 5Synchronize mobile client
  • 6Track all your emails
  • Next

Resco CRM solution can be customized in many ways to meet your needs. You can add or edit entities, define your views and forms, and much more.

To start customizing, hit “Customize” at the upper right corner on the home screen.

  • 1Get started with the Web client
  • 2Customize the solution
  • 3Customization console
  • 4Import your data
  • 5Synchronize mobile client
  • 6Track all your emails
  • Next

A. Edit Item

Change the structure of entities, views and forms.

B. Arrange Items

Make the home section work for you — add, delete or move items as you need.

C. Add New Item

Create your custom entity.

Save and publish the changes, so they are visible in the web and mobile client.

  • 1Get started with the Web client
  • 2Customize the solution
  • 3Customization console
  • 4Import your data
  • 5Synchronize mobile client
  • 6Track all your emails
  • Next

To manage your data follow these steps:

Customize — Settings — Import/manage your data

Here you can view, create, update or delete records.

Records can be imported from
GoogleGoogle, ExchangeExchange, LinkedInLinkedIn or your CSV file.

  • 1Get started with the Web client
  • 2Customize the solution
  • 3Customization console
  • 4Import your data
  • 5Synchronize mobile client
  • 6Track all your emails
  • Next

Download the Resco CRM app from your store (Google Play, App Store & Windows Store).

iOS Android Windows

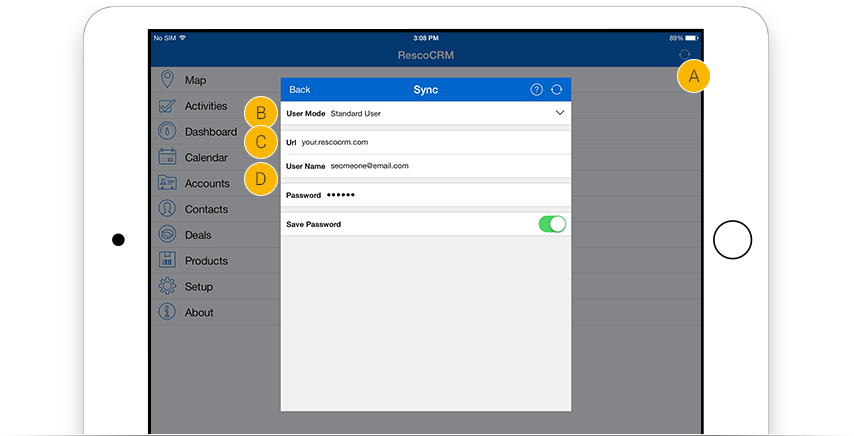
To synchronize the app follow these steps:

A. Tap the Sync buttonSync button

B. Select the user mode “Standard User”

C. Fill in the URL of your Resco CRM organization

D. Type in your User Name (your registration e-mail) & Password

Then just tap the Sync buttonSync button again to synchronize the app with the Resco CRM server.

  • 1Get started with the Web client
  • 2Customize the solution
  • 3Customization console
  • 4Import your data
  • 5Synchronize mobile client
  • 6Track all your emails
  • Next
Work with your emails directly in your Resco CRM organization

Work with your emails directly in your Resco CRM organization

  1. Go to Gmail or Exchange folder
  2. Get access to all the emails and folders (the same ones you have created and used in your  Gmail/Exchange client)
  3. Create new contacts and accounts from received emails (click on the email address of the sender and create a contact/account)
  1. Track your emails. The attachments can be tracked in Resco CRM too.
  2. Share the email communication with your team in “Activities connected with the selected account“
  3. Reply, forward or create new messages

And that’s it.

Now enjoy your Resco CRM.

To learn more, follow our blog.

If you have any questions,
feel free to contact us at [email protected]