
Collecting information in the field, in most use cases you expect a certain type of questionnaire to be available in certain situations and not in others. To enable this in Resco Inspections, we have introduced an option to associate a questionnaire template.
The general idea is that – when integrating Resco Inspections with Microsoft Dynamics 365/CRM – you can use many-to-many relationships to associate a questionnaire with an entity. The many-to-many relationship connects the questionnaire template to the actual record, so this defines which template belongs to which record.
We know that it’s always better to show than just to talk about it, so we’ve prepared the following detailed example.
This example demonstrates how easily you can configure multiple components in order to dynamically display the Questionnaire Templates based on the selected Appointment Type. Let’s assume we have three Appointment Types (Inspection, Repair, Maintenance) and three Questionnaire Templates.
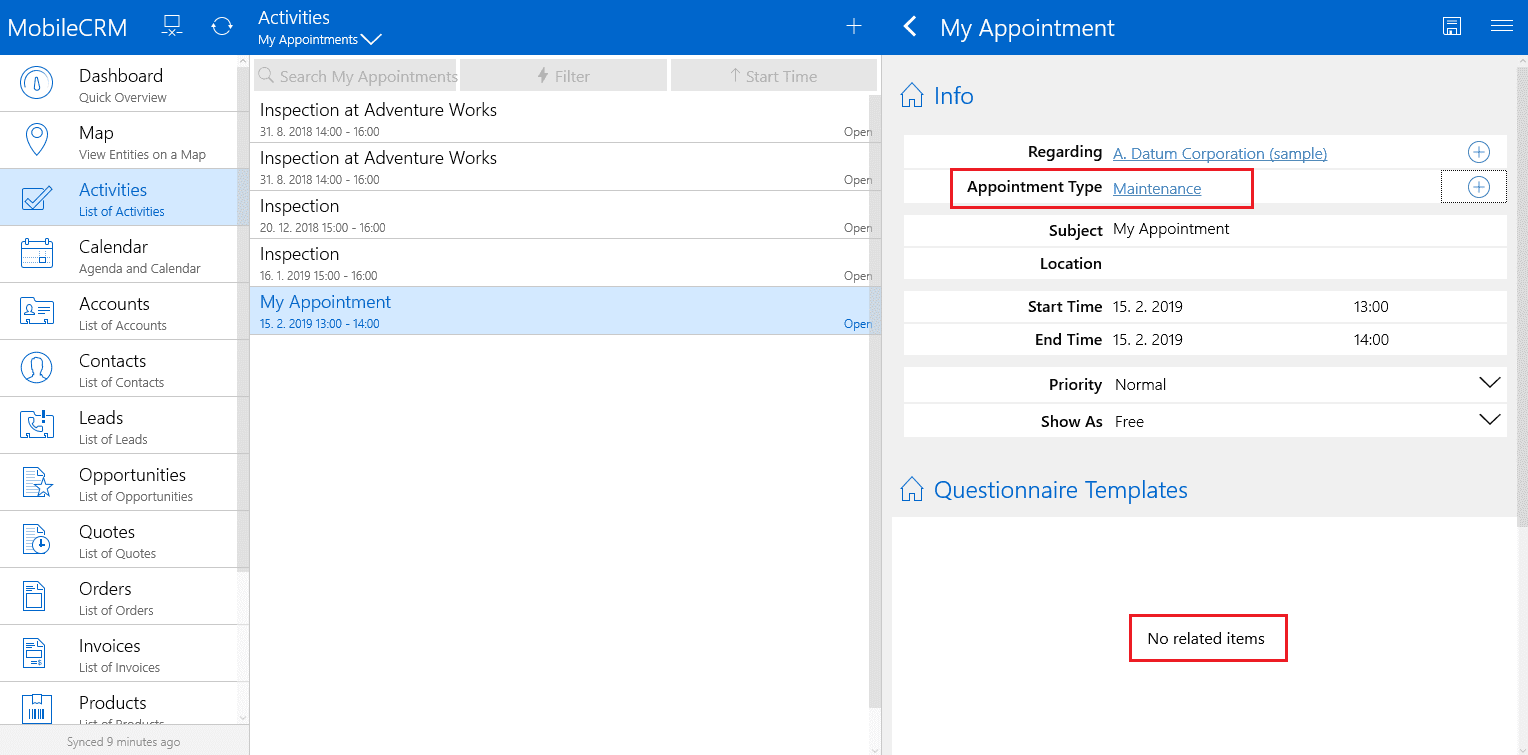
Our goal is to make sure that for the “Inspection” appointment two templates are displayed, for the “Repair” appointment one template is displayed and for the “Maintenance” appointment no template is displayed.
Prerequisites:
- Dynamics 365/CRM System Administrator/Customizer security role is required
- Current version of the Woodford solution must be imported in Dynamics 365/CRM
- Resco Inspections feature must be enabled in the Woodford customization tool
- Resco Inspections trial or real licence (Inspector and SuperUser) is obtained
- “Appointment Type” is a separate entity, not just an option-set field on the Appointment entity
- There is a 1:N relationship between “Appointment Type” entity and “Appointment” entity – in other words, there must be an “Appointment Type” lookup on the “Appointment” entity
High level steps:
-
- Create a new N:N relationship in Dynamics 365/CRM
- Associate the Questionnaire Templates with the Appointment Types in the Questionnaire Builder
- Perform customizations in the Woodford tool
- Sync the Resco mobile app and check if the templates are displayed dynamically
Detailed steps:
A) Create a new custom N:N relationship between the Questionnaire and the Appointment Type entities. In order to do that, go to Dynamics 365/CRM, open the top menu and navigate to Settings. In Customization section select Customizations and click on the Customize the System item. A new window showing the default solution appears:
- In the left panel expand the Entities item to display all Dynamics entities
- Locate the Appointment Type entity and expand it to display all sub-components
- Click on the N:N Relationships item
- Click on the New Many-to-Many Relationship button -> a new Relationship window appears
- In the Other Entity section select “Questionnaire” in the Entity Name dropdown menu
- In the Relationship Definition section type in the Name and Relationship Entity Name (or just leave the default texts)
- Click Save and Close button
- Click Publish All Customizations button and wait until the changes are published

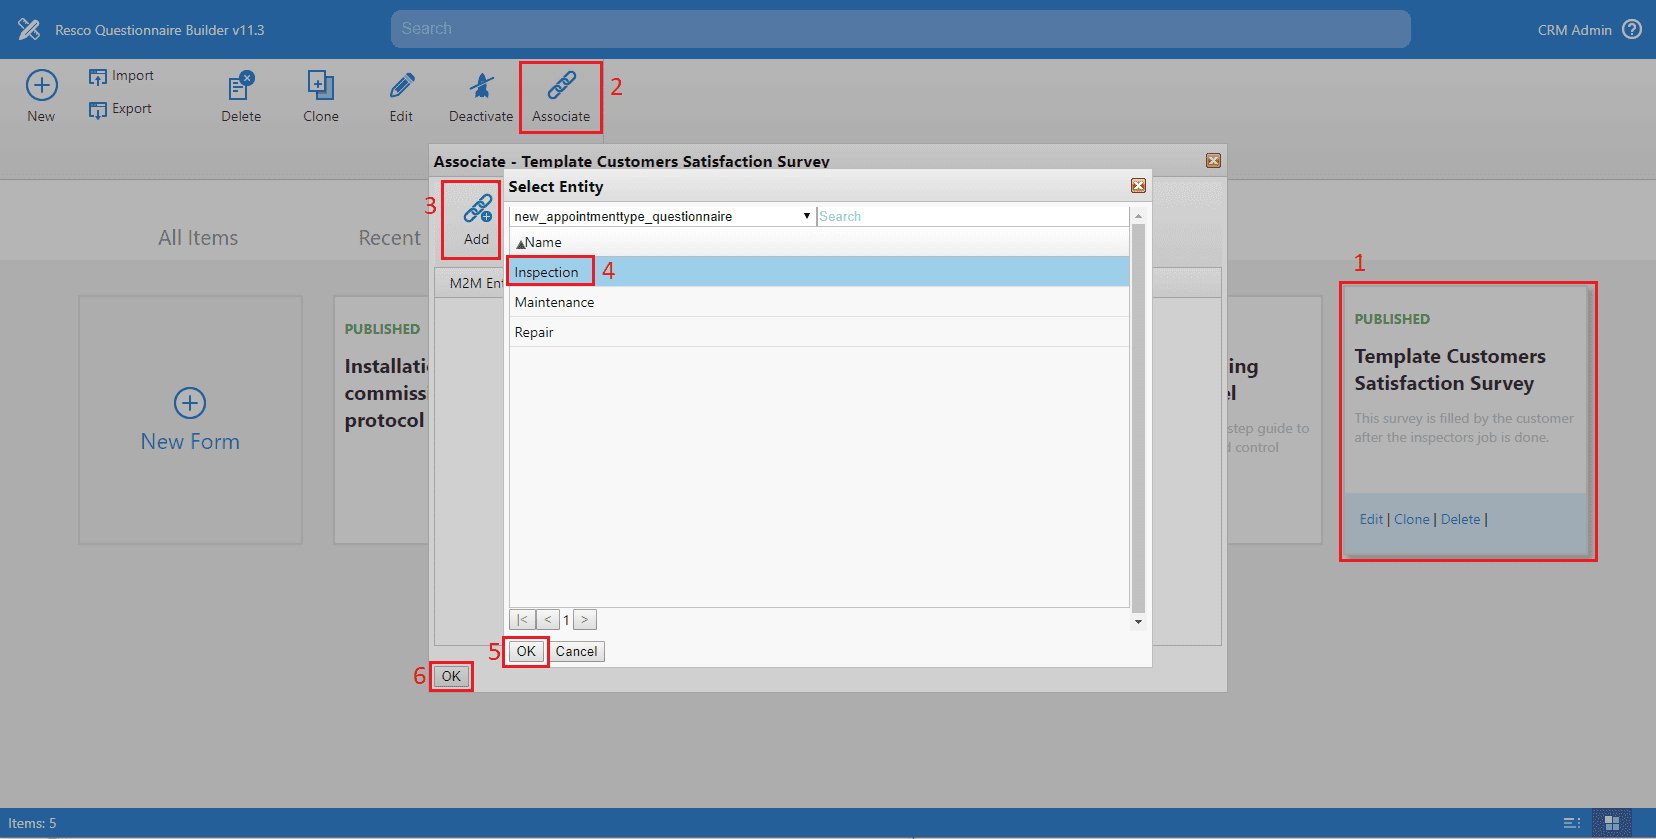
B) Associate each Questionnaire Template with the corresponding Appointment Type. In order to do that, go to Dynamics 365/CRM, open the top menu and navigate to Settings. In MobileCRM section select Inspections and click on the Builder item. A new window called Resco Questionnaire Builder appears:
- Select a Questionnaire Template
- Click on the Associate button to open the Associate dialog
- Click on the Add button to open the Select Entity dialog
- Select a corresponding Appointment Type from the list
- Click on the OK button to confirm the selection
- Close the Associate dialog by clicking on the OK button
In this example we’ve associated two templates with “Inspection” and one template with “Repair”; there is no template associated with the “Maintenance” type of appointment.
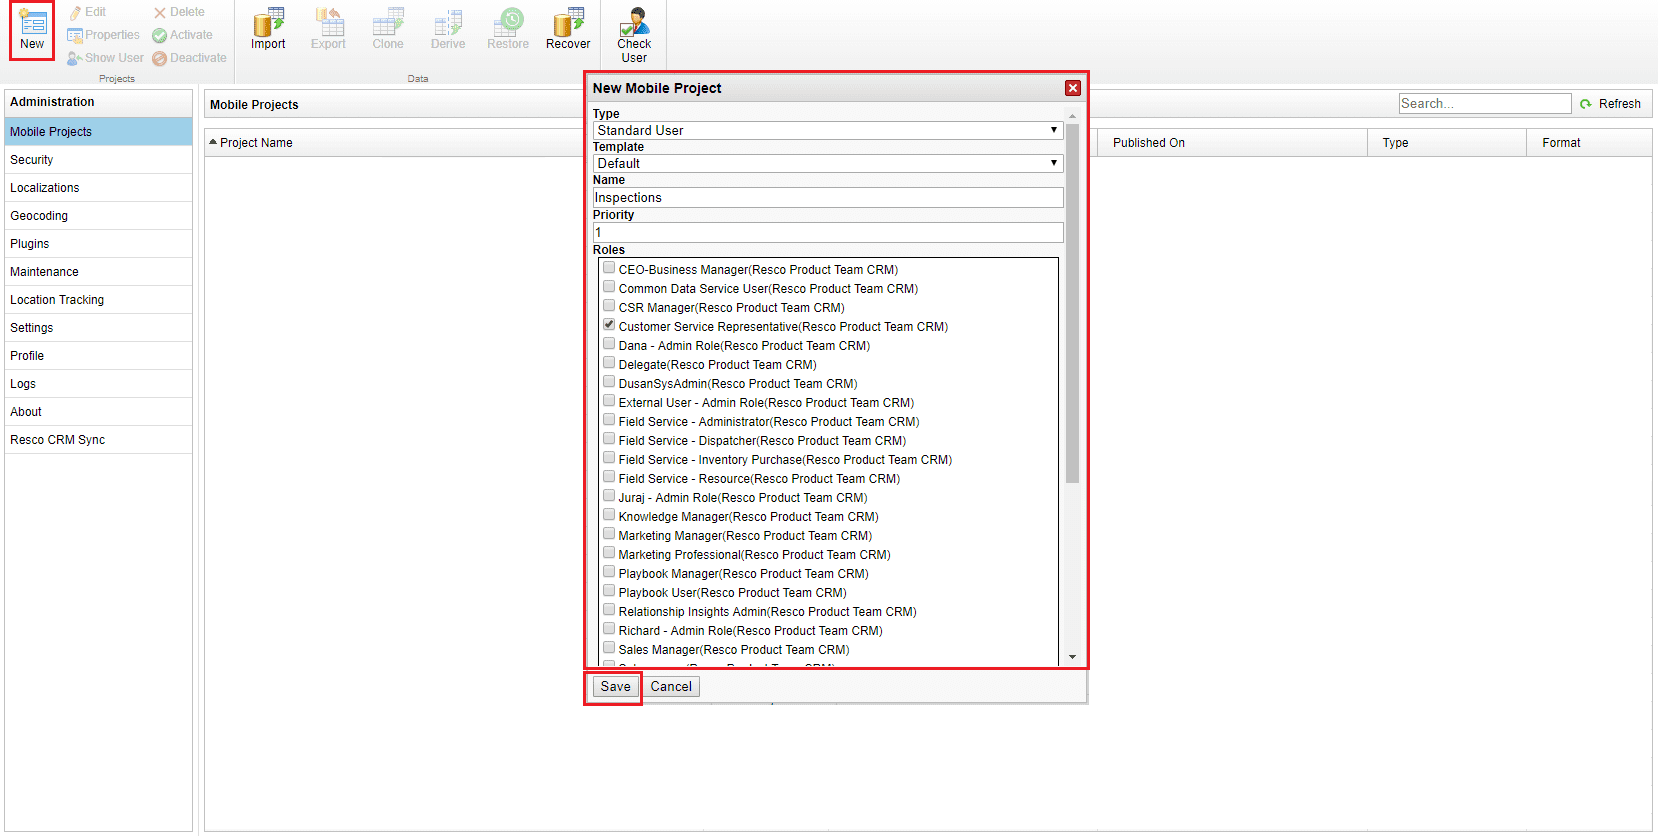
C) Customize and configure the Resco mobile app using the Woodford tool. In order to do that, go to Dynamics 365/CRM, open the top menu and navigate to Settings. In MobileCRM section select Woodford and click on the MobileCRM Woodford HTML5 item. A new window called Woodford appears showing the list of available mobile projects (if there are any).
- Select your preferred mobile project or create a new one by clicking on the New button -> fill in the New Mobile Project form:
- Type = Standard User
- Template = Default
- Name = Inspections (or anything meaningful)
- Priority = 1 (but if you already have any other mobile project, select a higher number than the existing project has)
- Roles – select a corresponding security role for your user (make sure the security role has all necessary privileges also for the custom entity Appointment Type)
- Click Save to close the form
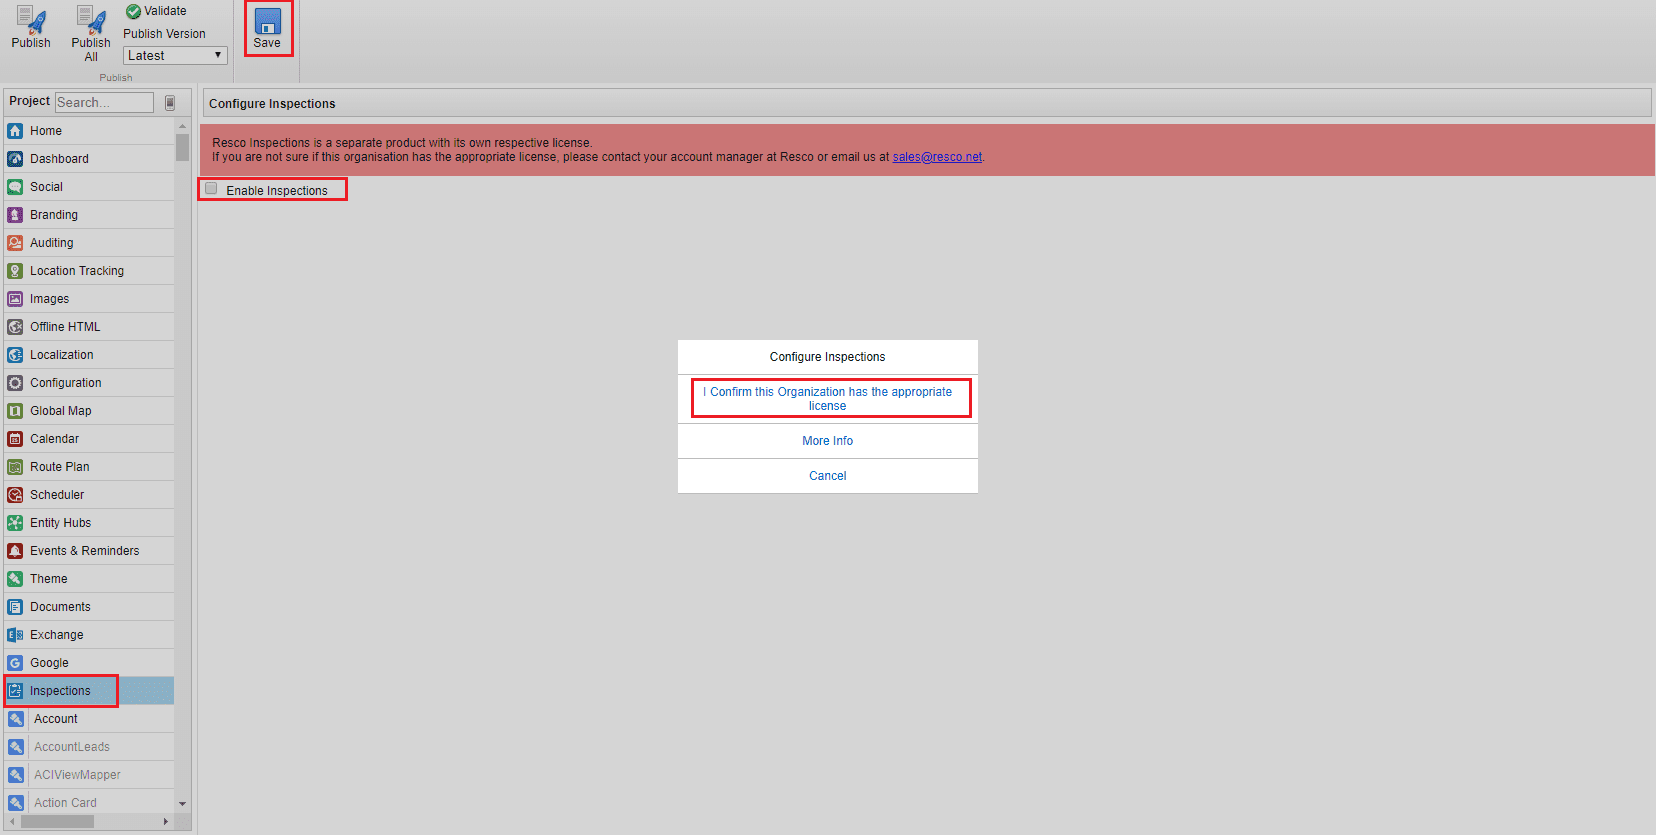
- Open the mobile project selected/created in step 1. In the left panel select the Inspections item and check the Enable Inspections checkbox. When confirmation pop-up appears, select the “I Confirm this Organization has the appropriate license” option and save the changes.
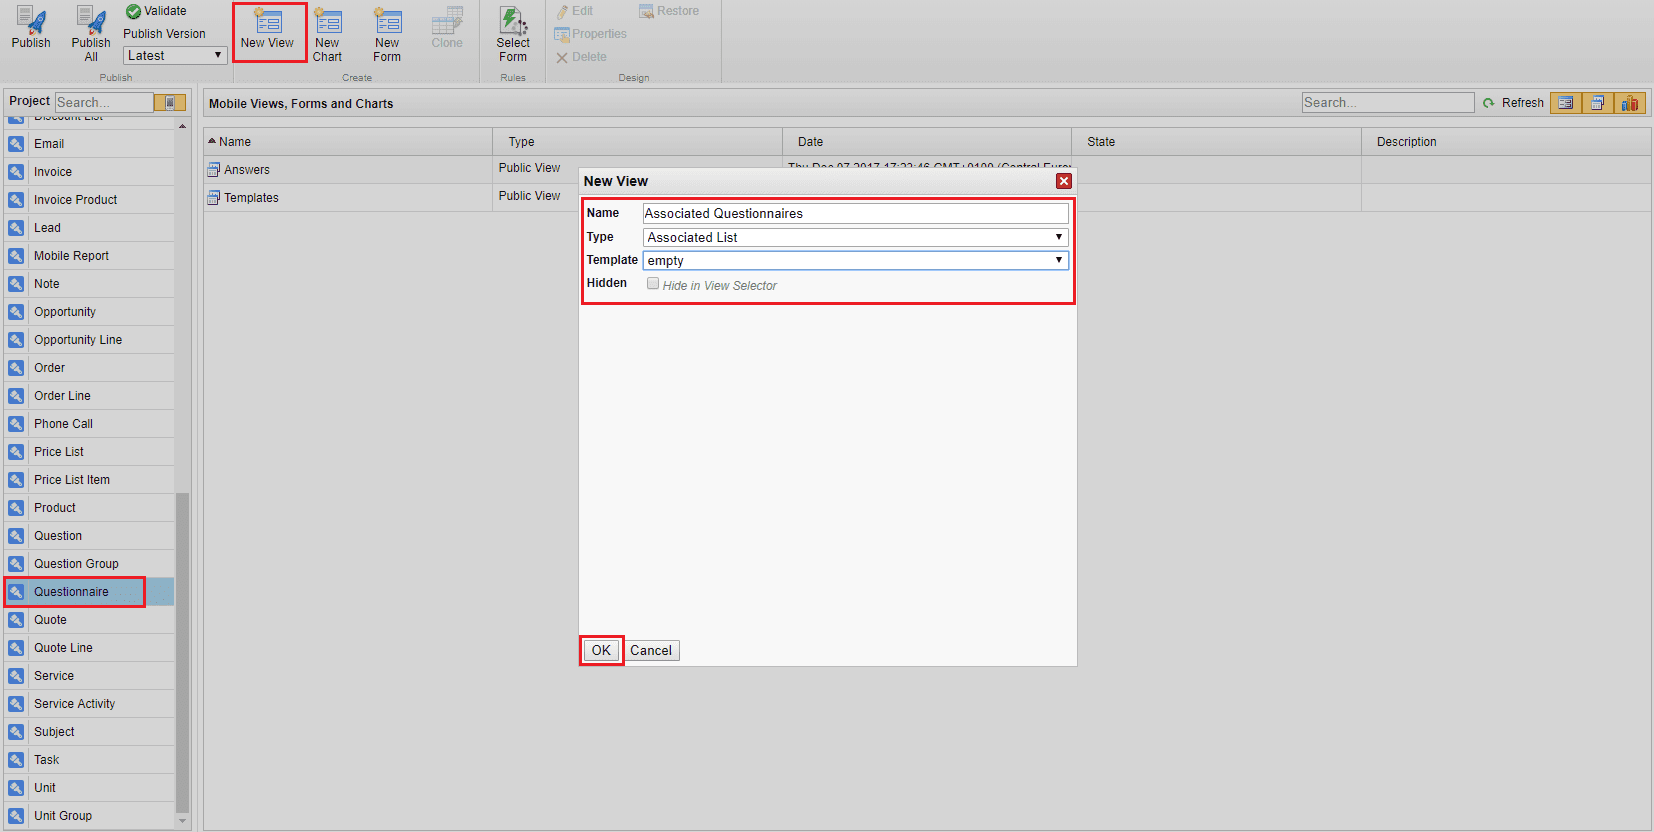
- Refresh the web browser and re-open the mobile project. In the left panel locate and double-click the Questionnaire item to show the pre-defined views. In the top menu click on the New View button and fill the New View form:
- Name = Associated Questionnaires
- Type = Associated List
- Template = empty
- Hidden = unchecked
- click OK -> View Designer appears -> in the top menu click Save & Close button
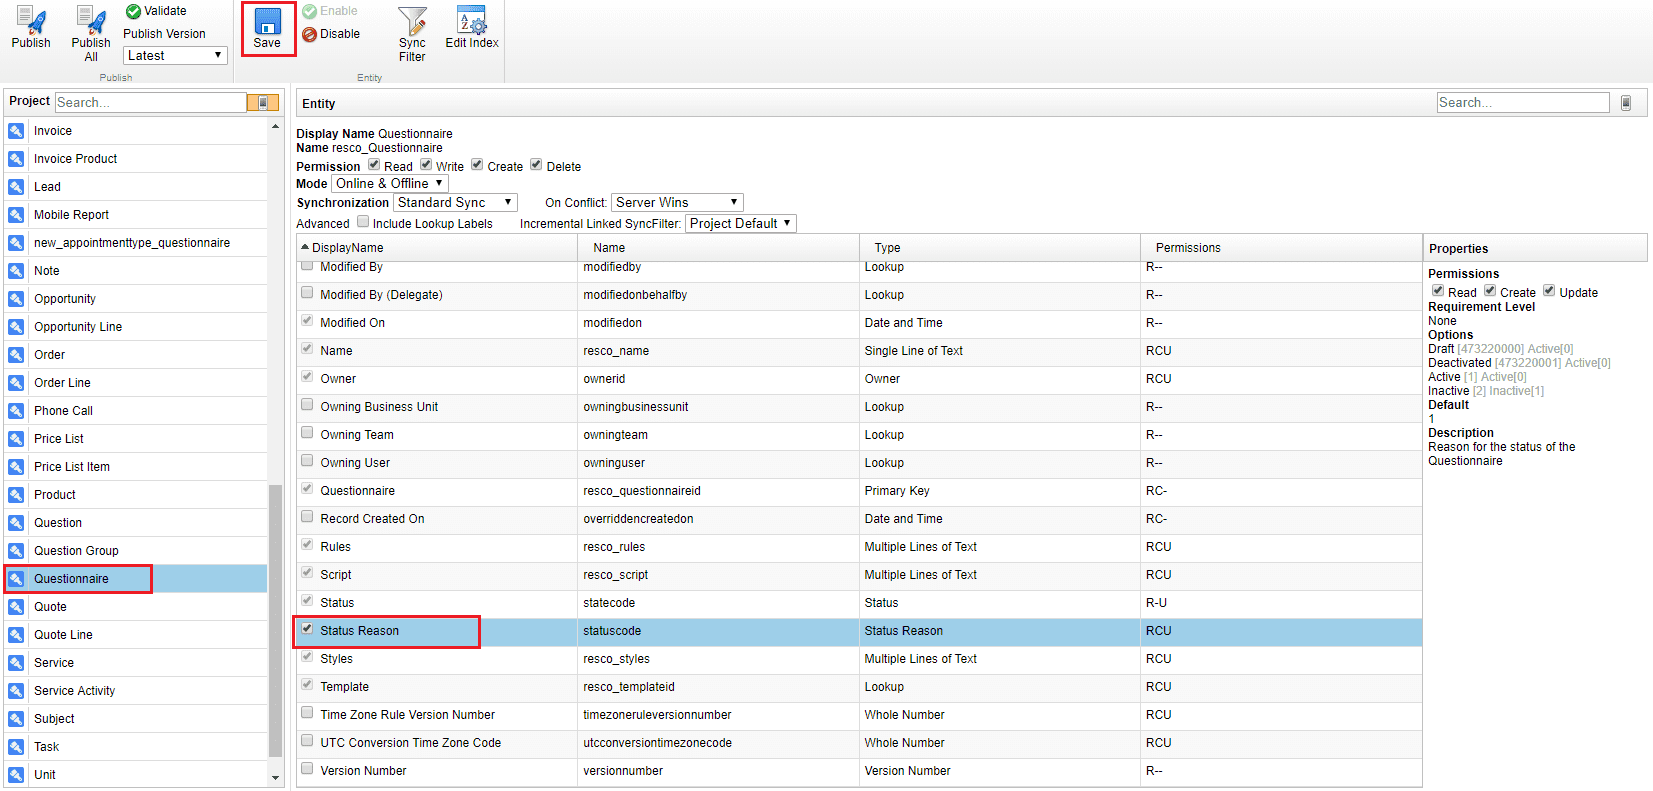
- In the left panel select the Questionnaire item, locate and check the Status Reason field in the list of available fields and save your changes:
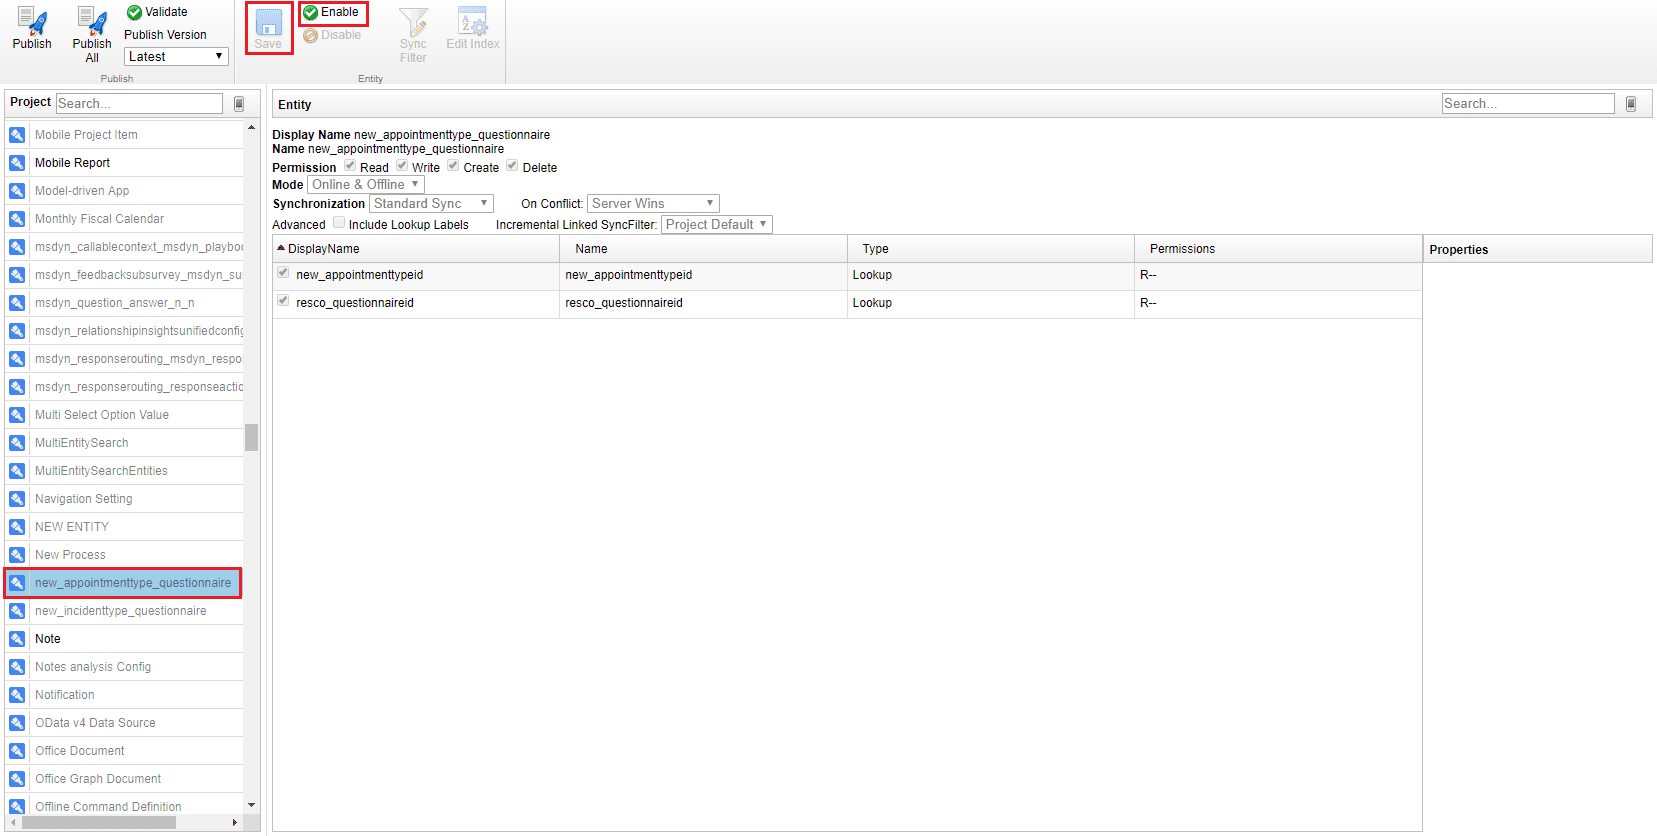
- In the left panel locate and select the N:N relationship entity that you’ve configured in step A.6. In this example it’s called “new_appointmenttype_questionnaire” and it’s greyed out. In the top menu click on Enable button to activate this entity and then click on Save button:
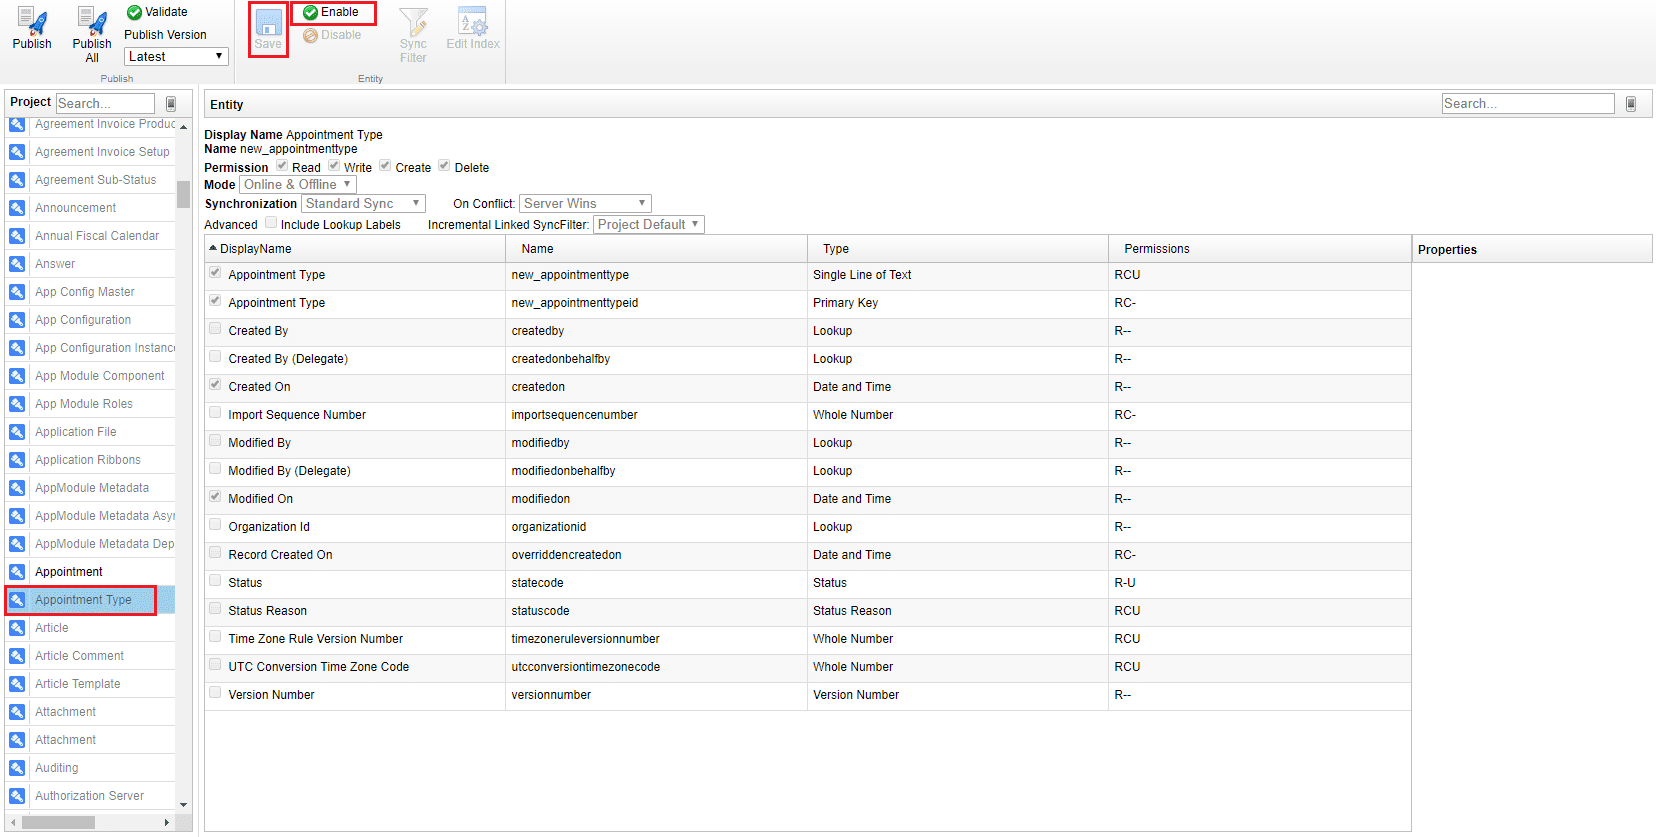
- In the left panel locate and select an Appointment Type item (which is greyed out), in the top menu click on Enable button to activate this entity and then click on Save button:
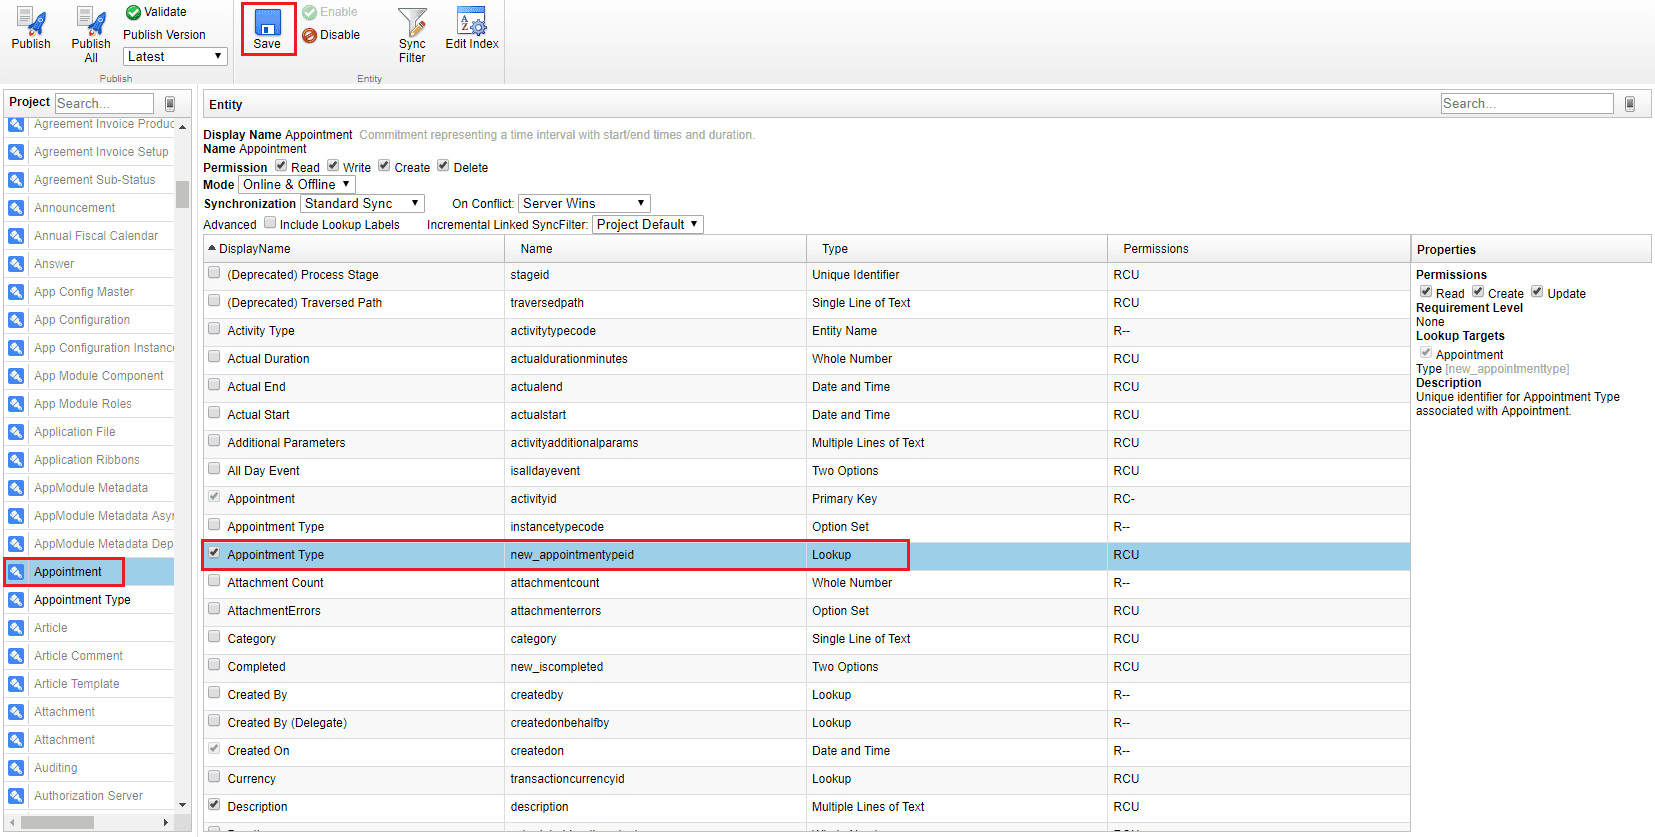
- In the left panel select an Appointment item, locate and check the Appointment Type lookup field (not the option set!) in the list of available fields and save your changes:
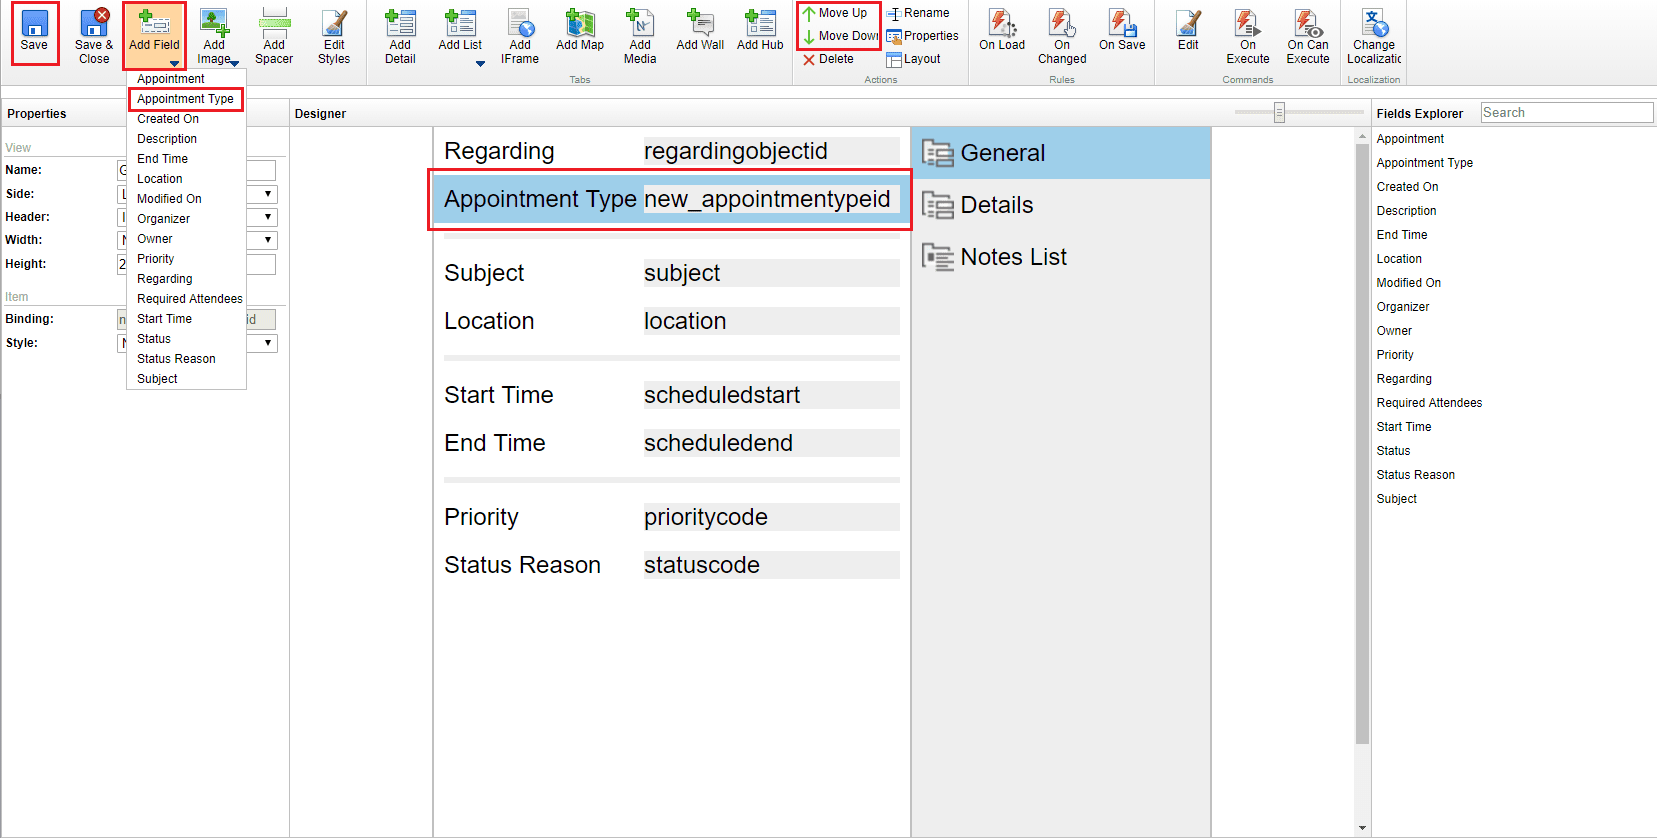
- In the left panel double-click the Appointment item to show the pre-defined form, views and charts. Double-click the Default form to open the Form Designer. In the top menu click on the Add Field button and select the Appointment Type to add this field on the form. Then you can adjust the location of this field by using the Move Up and Move Down buttons. Click on the Save button to save your changes (do not close the Form Designer).
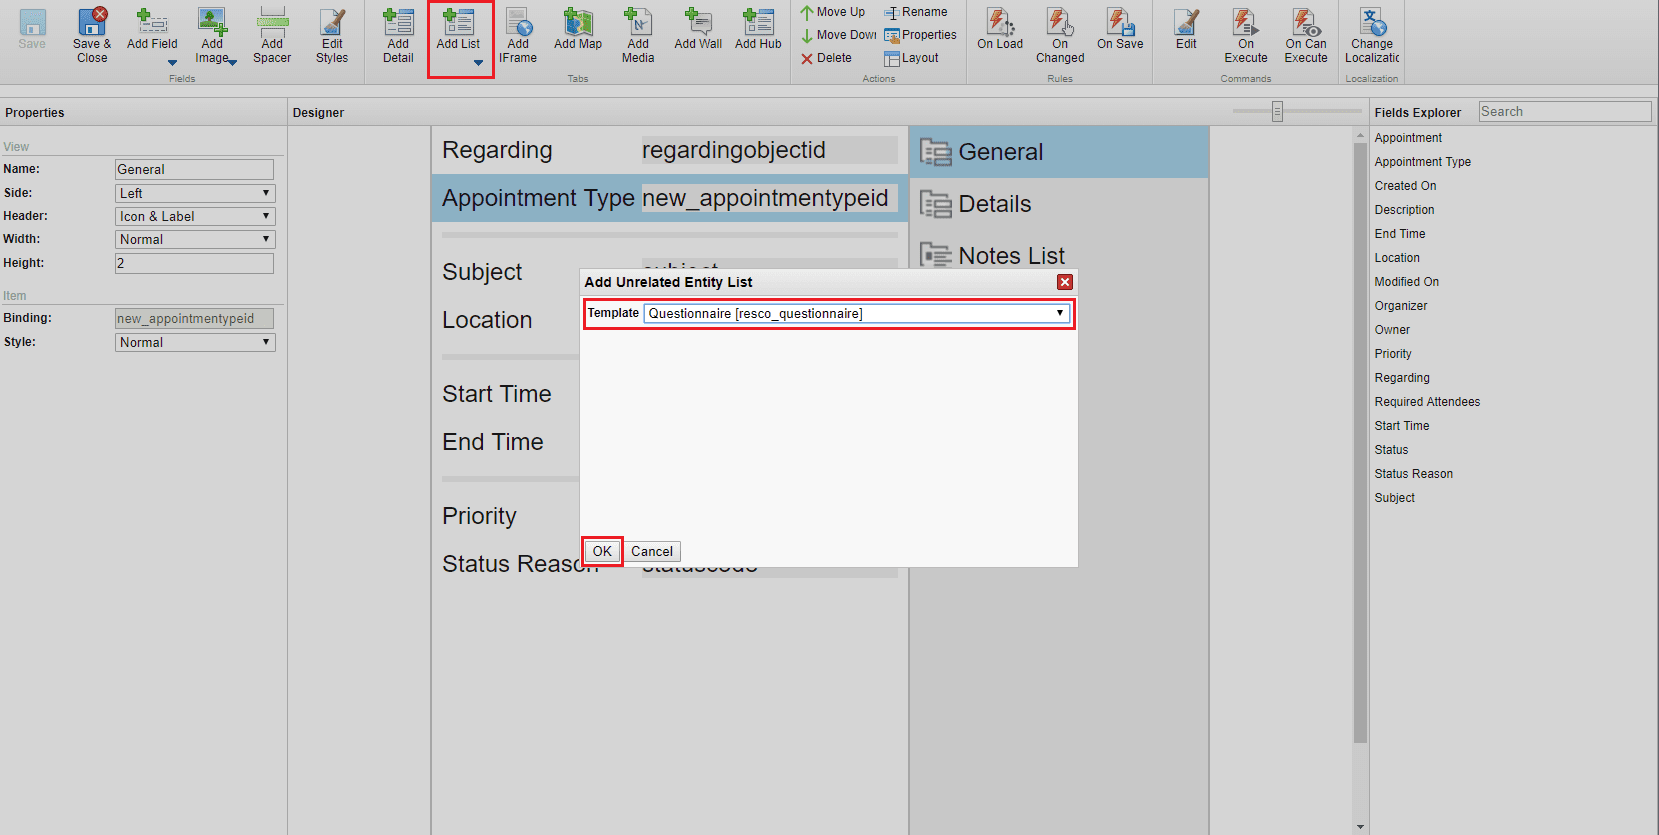
- In the top menu click on the Add List button and select the Unrelated Entity List option. In the Template dropdown menu select the Questionnaire [resco_questionnaire] option and click OK.
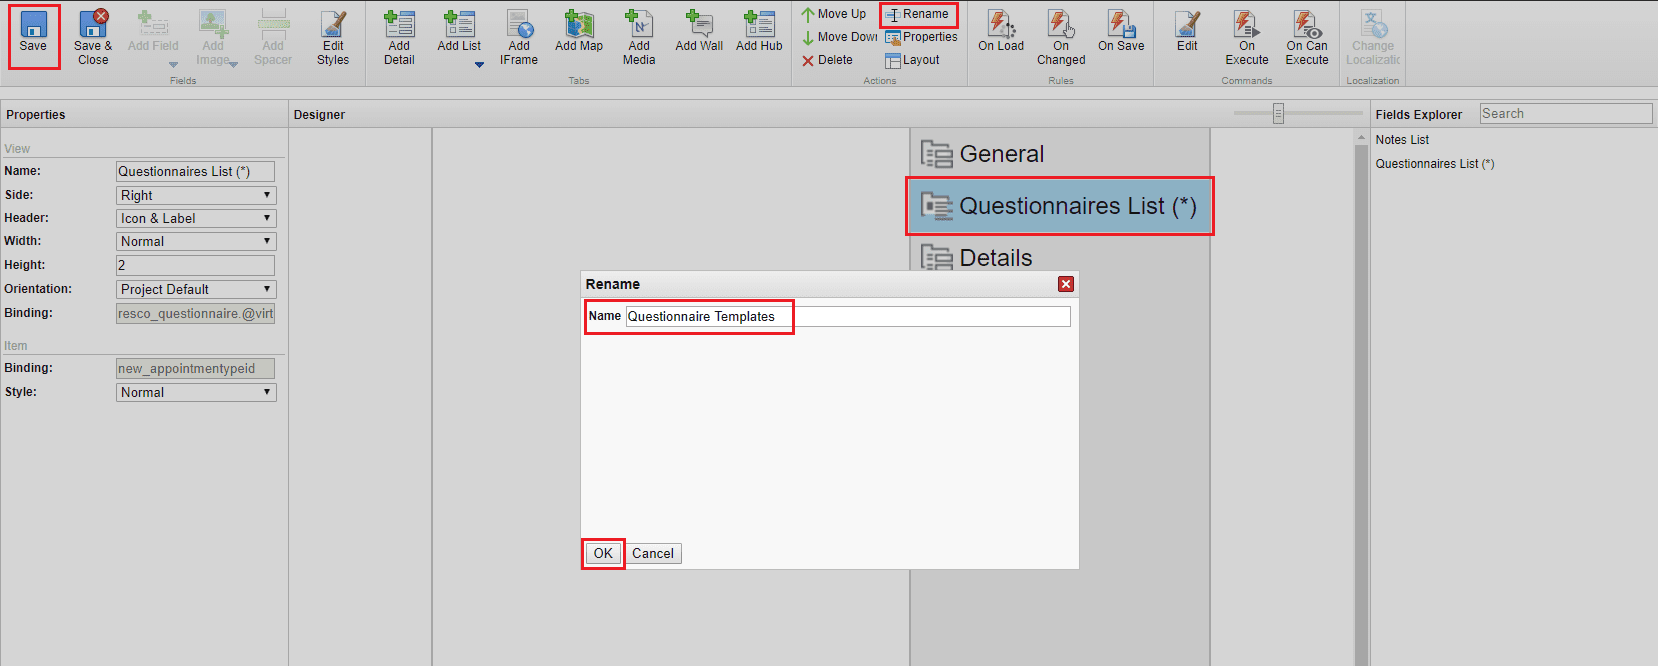
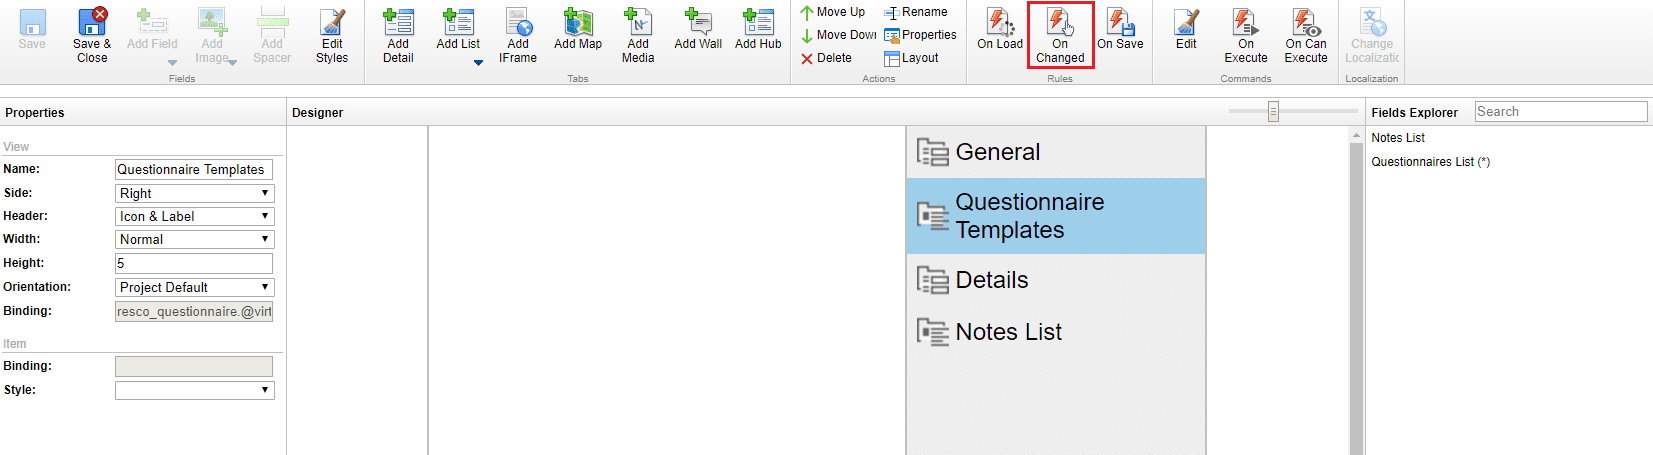
- Select the newly created tab called Questionnaires List (*), in the top menu click on the Rename button, change the name to “Questionnaire Templates”, click OK and save your changes (do not close the Form Designer).
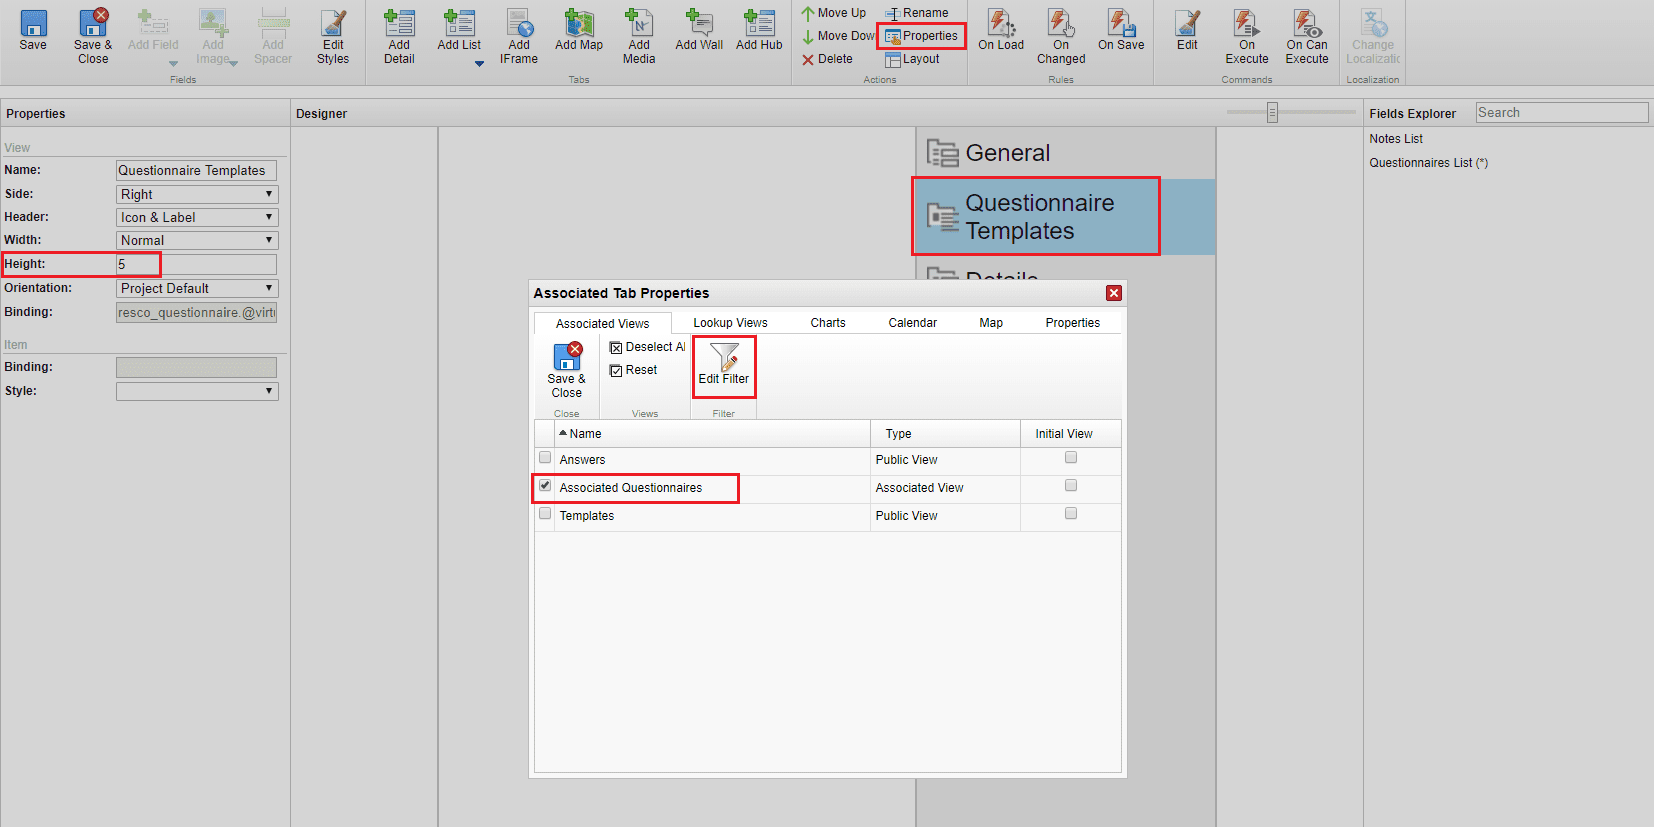
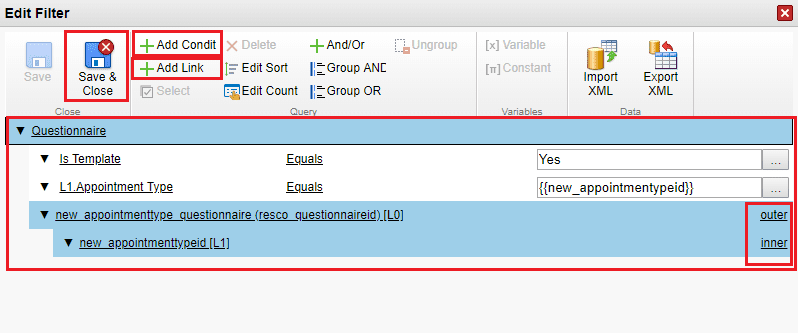
- Select the renamed tab Questionnaire Templates and in the left Properties menu change the Height to 5. Then in the top menu click on the Properties button. Make sure that only the Associated Questionnaires view (created in step C.3.) is checked, uncheck any other views. Then click on the Edit Filter button to set up the filter that will ensure that only the questionnaire templates associated with the selected Appointment Type are displayed.
- Configure the filter according to the screenshot below:
- add the condition Is Template = Yes
- add link for the N:N relationship entity created in step A. (in this example it is called “new_appointmenttype_questionnaire (resco_questionnaireid)”) and make sure this L0 link is defined as “outer”
- add link for the Appointment Type entity (in this example it is called “new_appointmenttypeid”) and make sure this L1 link is defined as “inner”
- add condition L1.Appointment Type = new_appointmenttypeid (select this via Variable button)
- click Save & Close to save your changes and close the Edit Filter and Properties windows
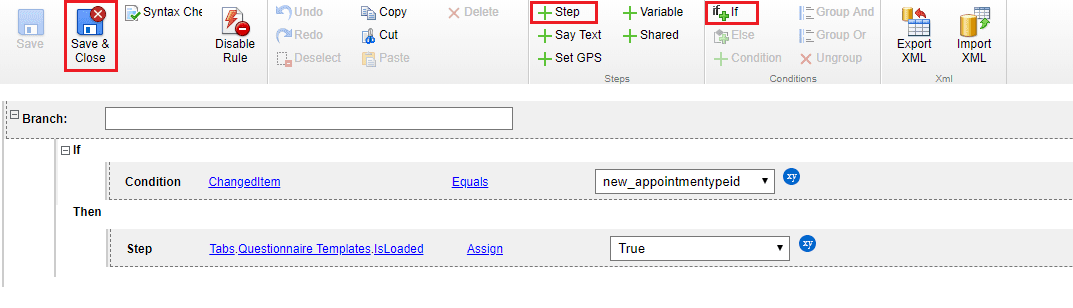
- On the Appointment form in the top menu click on the On Changed button in order to configure a simple rule to ensure that the Questionnaire Templates tab is refreshed when user changes the Appointment Type (see the screenshot below):
- add condition If ChangedItem = new_appointmenttypeid
- add step Tabs.Questionnaire Templates.IsLoaded = True
- click Save & Close button to save your changes and close the Rules Editor
- On the Appointment form click the Save & Close button to save your changes. Then in the top menu click the Publish button to publish the whole mobile project.

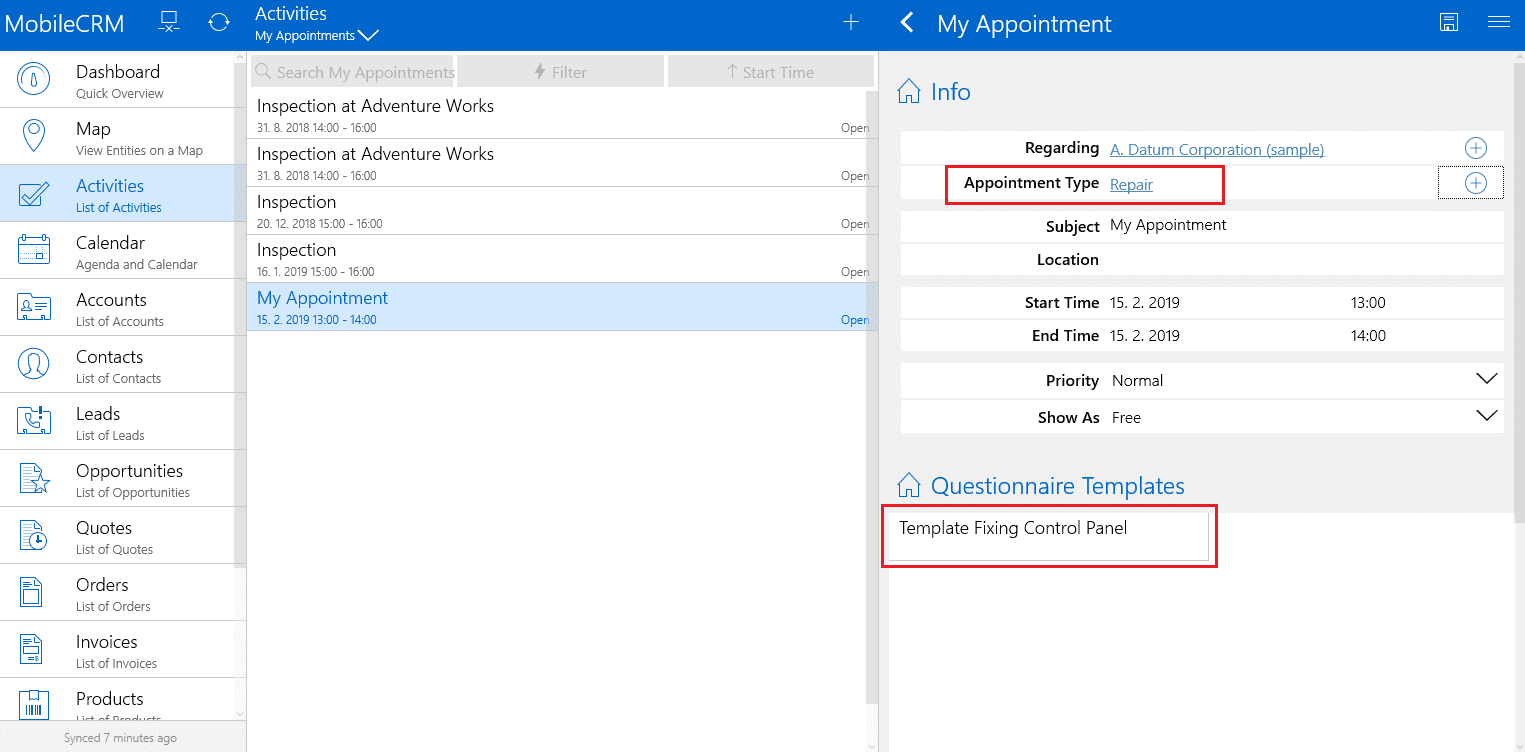
D) Sync the Resco MobileCRM app using your Dynamics 365/CRM credentials, then in the left menu navigate to Activities and create a new appointment.
If you select the Appointment Type = Inspection, there are two templates available in the Questionnaire Templates section.

If you select the Appointment Type = Repair, there is one template available in the Questionnaire Templates section.
If you select the Appointment Type = Inspection, there are two templates available in the Questionnaire Templates section.
And that’s it!
If you have any questions, don’t hesitate to contact us through Resco Support portal.